Hybrid iOS apps with Turbo Native Native authentication
This post was written for Turbo Native
It may still be useful, but parts of it are outdated.
Subscribe to my newsletter to get the latest updates.
Welcome back to my 6-part series on hybrid iOS apps with Turbo. In part 3 we learned how to do basic authentication via the web view.
One major limitation of web-only authentication is, well, it’s web only. That limits us to only interacting with our server via HTML and JavaScript. You’re out of luck if you need to make an authenticated HTTP request.
Native authentication, on the other hand, opens up a world of possibilities. It breaks your app out of the web world and enables fully native screens. Meaning, you can integrate native SDKs like location services and push notifications. Or, you can render SwiftUI views for the really important stuff!
This is part of a 6-part series on Hybrid iOS apps with Turbo Native.
- Hybrid iOS apps with Turbo – Part 1: The Turbo framework
- Hybrid iOS apps with Turbo – Part 2: URL routing
- Hybrid iOS apps with Turbo – Part 3: Forms and basic authentication
- Hybrid iOS apps with Turbo – Part 4: The JavaScript bridge
- Hybrid iOS apps with Turbo – Part 5: Native authentication
- Hybrid iOS apps with Turbo – Part 6: Tips and tricks
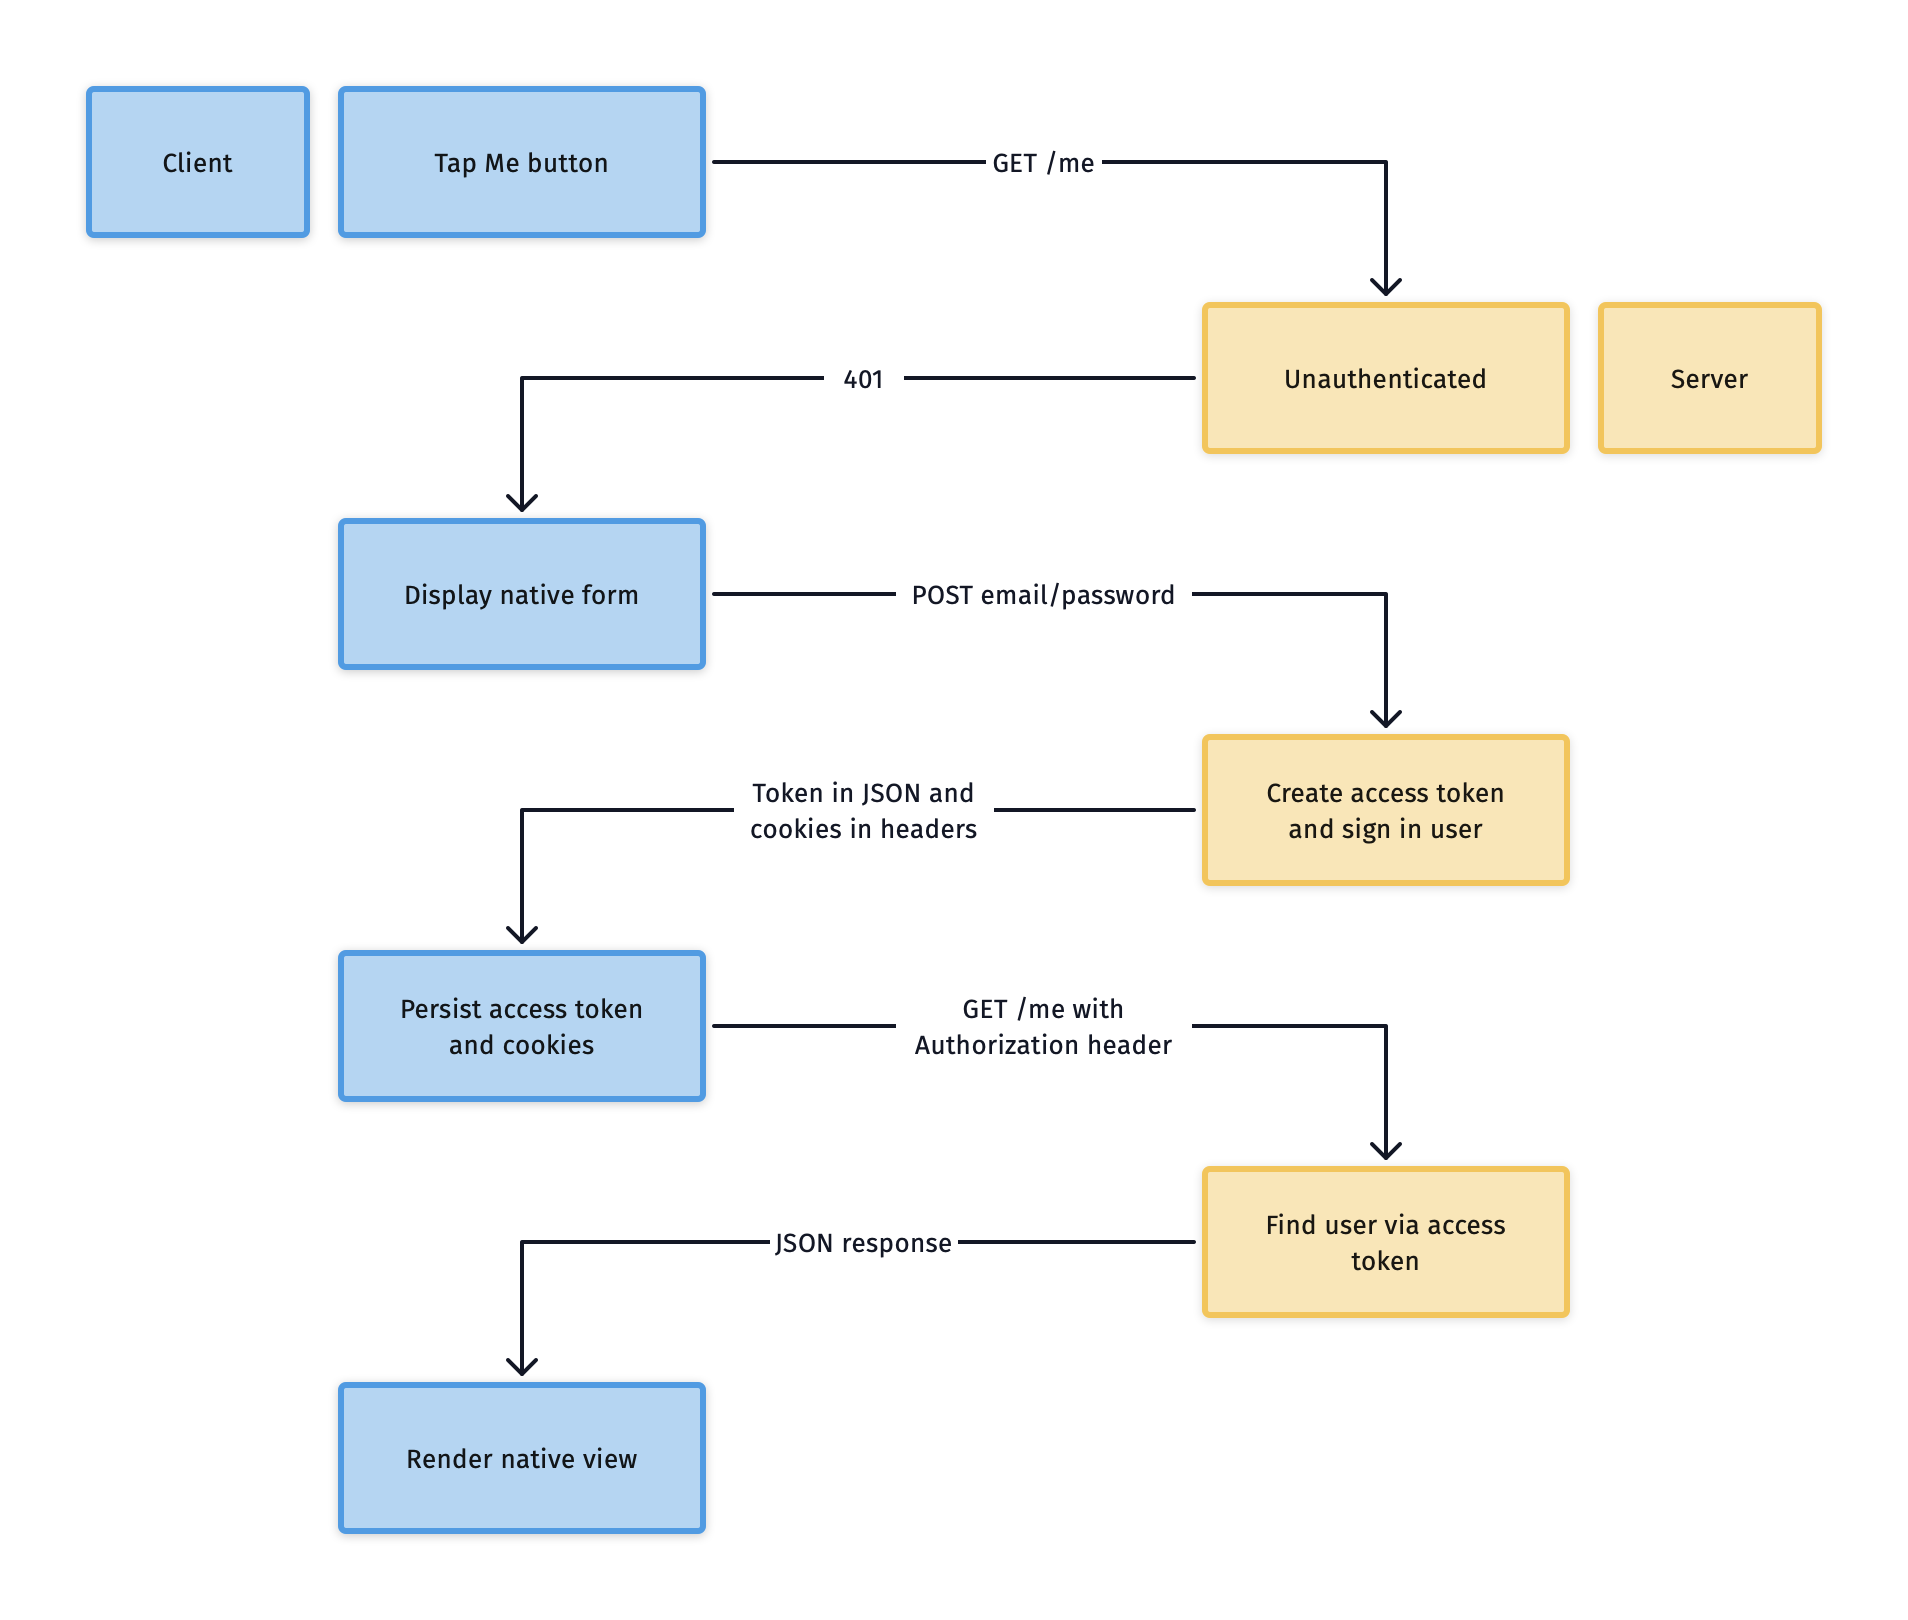
Before diving in, let’s outline the flow of information through the server and client.

These steps can be grouped into three big flows: unauthenticated requests, initial authentication, and authenticated requests.
- Unauthenticated requests
- Client requests an authenticated endpoint
- Server returns a 401 Unauthorized status code
- Client renders a native form
- Initial authentication
- Client POSTs the credentials
- Server creates an access token and signs in the user
- Client persists the access token and saves the cookies
- Authenticated requests
- Client uses the token to authenticate native screens
- Server authenticates user via token
1. Unauthenticated requests #
In order to catch the unauthenticated response in Turbo we need the server to return a non-200 status code. 401 Unauthorized is perfect, but you can also use 403 Forbidden.
If you’re using Devise, you can set up a Failure App to render custom status codes when your authenticate_user! before action fails. Add the following to config/initializers/devise.rb to configure the custom Failure App.
class TurboFailureApp < Devise::FailureApp
  include Turbo::Native::Navigation

  def respond
    if turbo_native_app?
      http_auth
    else
      super
    end
  end
end

Devise.setup do |config|
  # Your existing configuration...

  config.warden do |manager|
    manager.failure_app = TurboFailureApp
  end
end
#turbo_native_app? is part of turbo-rails and checks if the user agent contains “Turbo Native.” Make sure to set your user agent on each Session you use.
let session = Session()
session.webView.customUserAgent = "My App (Turbo Native) / 1.0"
Catching the error #
Back to the client. Like all other errors, this response will route to session(_:didFailRequestForVisitable:error:). We need to check the status code and kick off the authentication flow.
Sadly, the error parameter is untyped. So we need to first check if it is a TurboError and of type .http. If so, we can verify the status code.
func session(_ session: Session, didFailRequestForVisitable visitable: Visitable, error: Error) {
    if error.isUnauthorized {
        // Render native sign-in flow
    } else {
        // Handle actual errors
    }
}

extension Error {
    var isUnauthorized: Bool { httpStatusCode == 401 }

    private var httpStatusCode: Int? {
        guard
            let turboError = self as? TurboError,
            case let .http(statusCode) = turboError
        else { return nil }
        return statusCode
    }
}
Once we know the user needs to authenticate we can handle the sign-in flow natively. I usually reach for a new coordinator, but feel free to present a view controller if that is more comfortable for you.
Native sign-in form #
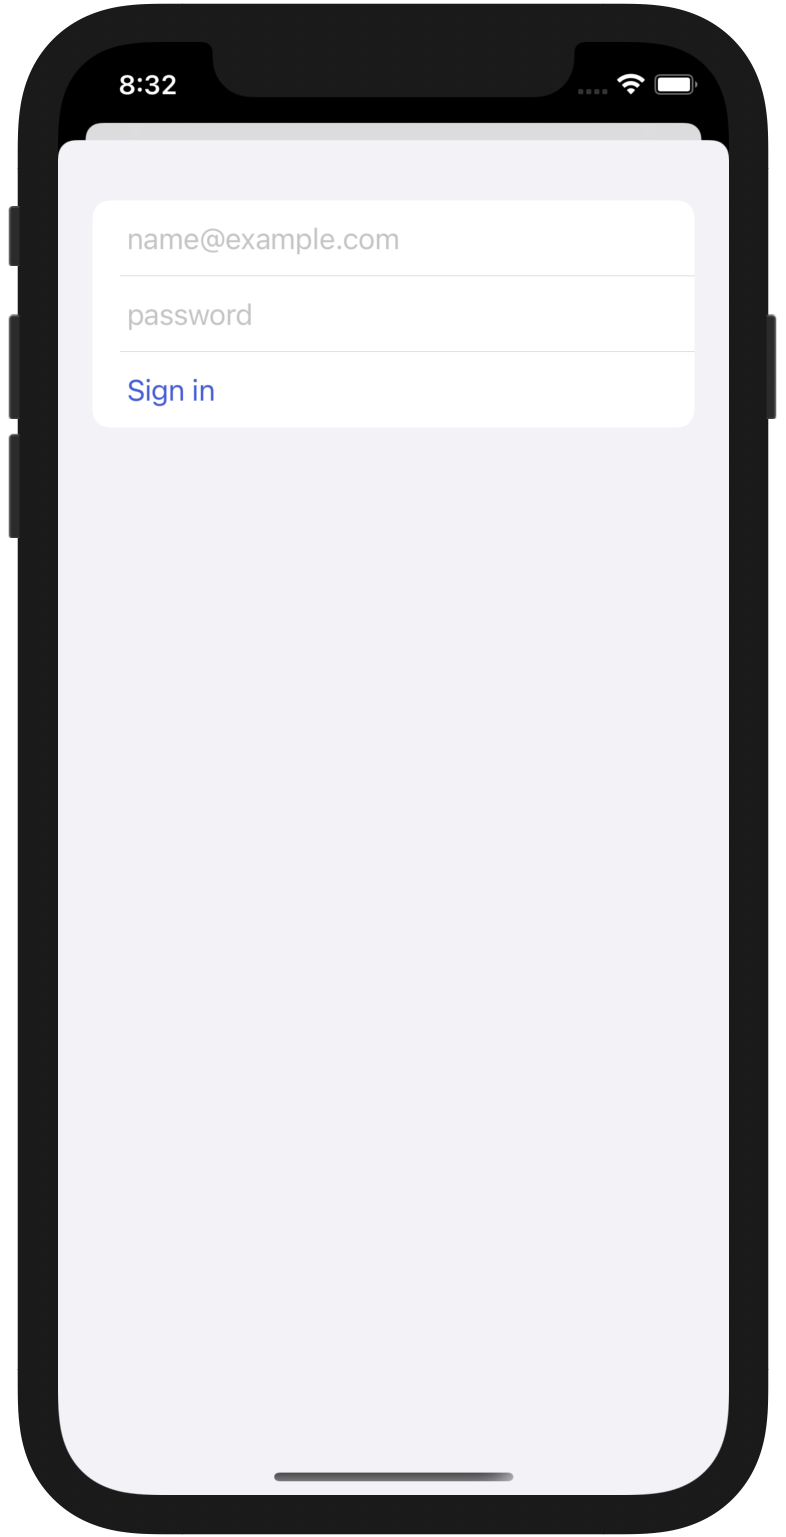
At a minimum, your sign-in form needs an email field, a password field, and a submit button. I’ve been using UIHostingController to wrap SwiftUI views lately and I really like the ergonomics. You get the short feedback loops of SwiftUI but aren’t required to convert your entire app away from UIKit.
let viewModel = SignInViewModel()
let view = SignInView(viewModel: viewModel)
let controller = UIHostingController(rootView: view)
navigationController.present(controller, animated: true)

class SignInViewModel: ObservableObject {
    @Published var email: String = ""
    @Published var password: String = ""

    func signIn() {
        // TODO: POST credentials to server.
    }
}

struct NewSessionView: View {
    @ObservedObject var viewModel: SignInViewModel

    var body: some View {
        Form {
            TextField("name@example.com", text: $viewModel.email)
                .textContentType(.username)
                .keyboardType(.emailAddress)

            SecureField("password", text: $viewModel.password)
                .textContentType(.password)

            Button("Sign in", action: viewModel.signIn)
        }
    }
}
This view isn’t styled, but SwiftUI and Form do a pretty good job making it look decent. Also, this would have been like 50 lines of UIKit code. 😆

2. Initial authentication #
Once the user taps “Sign in” we need to send their email/password to the server. We also need to set the user agent and content type to JSON on the request. This ensures Rails can identify it as a Turbo Native API request.
func signIn() {
    URLSession.shared.dataTask(with: request) { data, response, error in
        // TODO: Handle response: persist token and cookies
    }
}

private var request: URLRequest {
    var request = URLRequest(url: url)
    request.httpMethod = "POST"

    request.setValue("application/json", forHTTPHeaderField: "Content-Type")
    request.setValue("My App (Turbo Native)", forHTTPHeaderField: "User-Agent")

    let credentials = Credentials(email: email, password: password)
    request.httpBody = try? JSONEncoder().encode(credentials)

    return request
}

private struct Credentials: Encodable {
    let email: String
    let password: String
}
Generate an access token #
Back to the server. We need to authenticate this request, create an access token, and sign in the user. The access token will be used for future native requests and the cookies for future web requests.
First, authenticate the email/password combination. If you’re using Devise, you can authenticate via #valid_password? after finding the user. Otherwise, make sure you are securely doing this validation and avoiding timing attacks.
Next, generate the cookies and pass them to the response. With Devise you first need to remember the user. This ensures that the session cookie is set, which we will pass to the web view.
Finally, pass the generated access/auth token. This example is just that, an example. In production you should ensure this token is not stored in plain text and can be revoked when needed. JWTs or Rails 7’s Active Record Encryption can help.
class User: ApplicationRecord
  before_create do
    self.access_token = SecureRandom.hex(10)
  end
end

class API::AuthController < API::ApplicationController
  def create
    user = User.find_by(email: params[:email])
    if user&.valid_password?(params[:password])
      user.remember_me = true
      sign_in(user)
      render json: { token: user.access_token }
    else
      render :unauthorized
    end
  end
end

class API::ApplicationController < ApplicationController
  skip_before_action :verify_authenticity_token
end
Persist the access token and cookies #
Back to the client again. We now need to securely persist the access token and pass the cookies to the web view.
From the docs, the “keychain is the best place to store small secrets, like passwords and cryptographic keys.” The API is kind of rough, so I always reach for the KeychainAccess package when I need to persist secure information.
The cookies are available in the request in the Set-Cookie header. We can transform those into instances of HTTPCookie via cookies(withResponseHeaderFields:for:) and copy them to our web view’s shared storage.
Here’s a rough outline of how you could implement all of that in response to your POST request from earlier. Error handling was omitted to keep the example manageable. Also, note that setting the cookies is asynchronous.
private struct AccessToken: Decodable {
    let token: String
}

guard
    error == nil,
    let response = response as? HTTPURLResponse,
    // Ensure the response was successful
    (200 ..< 300).contains(response.statusCode),
    let headers = response.allHeaderFields as? [String: String],
    let data = data,
    let token = try? JSONDecoder().decode(AccessToken.self, from: data)
else { return /* TODO: Handle errors */ }

// Persist the access token in the secure keychain
let keychain = Keychain(service: "Turbo-Credentials")
keychain["access-token"] = token.token

// Copy the "Set-Cookie" headers to the shared web view storage
let cookies = HTTPCookie.cookies(withResponseHeaderFields: headers, for: url)
HTTPCookieStorage.shared.setCookies(cookies, for: url, mainDocumentURL: nil)
let cookieStore = WKWebsiteDataStore.default().httpCookieStore
cookies.forEach { cookie in
    cookieStore.setCookie(cookie, completionHandler: nil)
}
We now have our access token saved in the keychain (for native requests) and our web view has all session cookies it needs. All that’s left is to reload our sessions and we are good to go!
let session = Session()
session.reload
3. Authenticated requests #
Let’s revisit that GET request to /me in the diagram.
Now that we have an access token we can pass it to the server to authenticate the user. To keep with standard practices, we can use Bearer Authentication to pass along our credentials. Bearer Authentication, also called Token Authentication, is implemented by setting a specific HTTP header, Authorization.
let keychain = Keychain(service: "Turbo-Credentials")
if let token = keychain["access-token"] {
    var request = URLRequest(url: url)
    request.setValue("Bearer: \(token)", forHTTPHeaderField: "Authorization")
    // ...
}
Back on the server, we can add a helper method to our API controller to find the user via the access token. Calling this in a before_action will authenticate the user via their access token. The “magic” here is using #sign_in from Devise. This sets current_user automatically!
Also, note that we are passing false to the store key. This tells Devise not to create a session for the request and ignore cookies.
class API::ApplicationController < ApplicationController
  skip_before_action :verify_authenticity_token

  protected

  def authenticate_api_user!
    if (user = api_user)
      sign_in(user, store: false)
    else
      head :unauthorized
    end
  end

  private

  def api_user
    token = request.headers.fetch("Authorization", "").split(" ").last
    User.find_by(access_token: token) if token.present?
  end
end
Wrapping up #
This is only an example of one implementation of native authentication with Turbo. Ideas for improvement are a better designed sign-in screen, using JWT or OAuth for access tokens, and leveraging a Swift networking library to cut down on the boilerplate.
I maintain HTTP Client, a small Swift library that drastically reduces the boilerplate needed to make network requests. It automatically sets HTTP headers and parses responses directly to your Codable objects.
You’ve now broken your hybrid app out of the web only world and opened up iOS SDKs and fully native screens. You could route /my/items/map to a native MapView instead of dealing with Google Maps in the browser. Or route messages/new to use a completely custom text editor instead of something web-based.
What will you build now that you have access to the best parts of Rails and the best parts of iOS? Let me know on Twitter or by sending me an email.
