
Turbo Native iOS and Android apps in 15 minutes
With Turbo Native, Ruby on Rails developers can build iOS and Android apps that aren’t a nightmare to maintain. An embedded web view renders the HTML and CSS content you already have, letting you skip the slow and expensive development cycles of building fully native apps. Make a change to your Rails codebase and the apps are updated right away - without releasing new versions to the app stores.
But getting started isn’t easy. You need to know a bit of Swift and Kotlin to build the initial version of the apps. And the official documentation is… a little sparse.
This guide hopes to fix that by providing a step-by-step tutorial to build basic iOS and Android Turbo Native apps from scratch. You won’t need any mobile experience, just a macOS device with Xcode and Android Studio installed.
Think of this guide as dipping your toes into the waters of Turbo Native development. The goal is to get you started and get a feel for what mobile development with Rails is like.
What are we building?
By the end of this guide you will have an iOS app and Android app both powered by Turbo Native. They will point to the Turbo Native Demo server, so you won’t need to do any backend coding. The source code for that server can be found on GitHub.

These apps will implement a basic Turbo Native integration: pushing new screens with animation, popping screens (navigating back), loading indicators, and error handling. But they won’t include Strada or any native integrations. Find links at the end for where to go next to further upgrade your apps.
Without further ado, let’s dive in! We’ll start with iOS.
Build a Turbo Native iOS app
First, download the latest version of Xcode from the App Store. This guide and the screenshots reference Xcode 15.3.
Once downloaded and installed, open Xcode and wait for any iOS SDKs to finish downloading.
Create a new Xcode project
In Xcode click File → New → Project…
Select the iOS tab at the top then App from the Application section. Click Next.
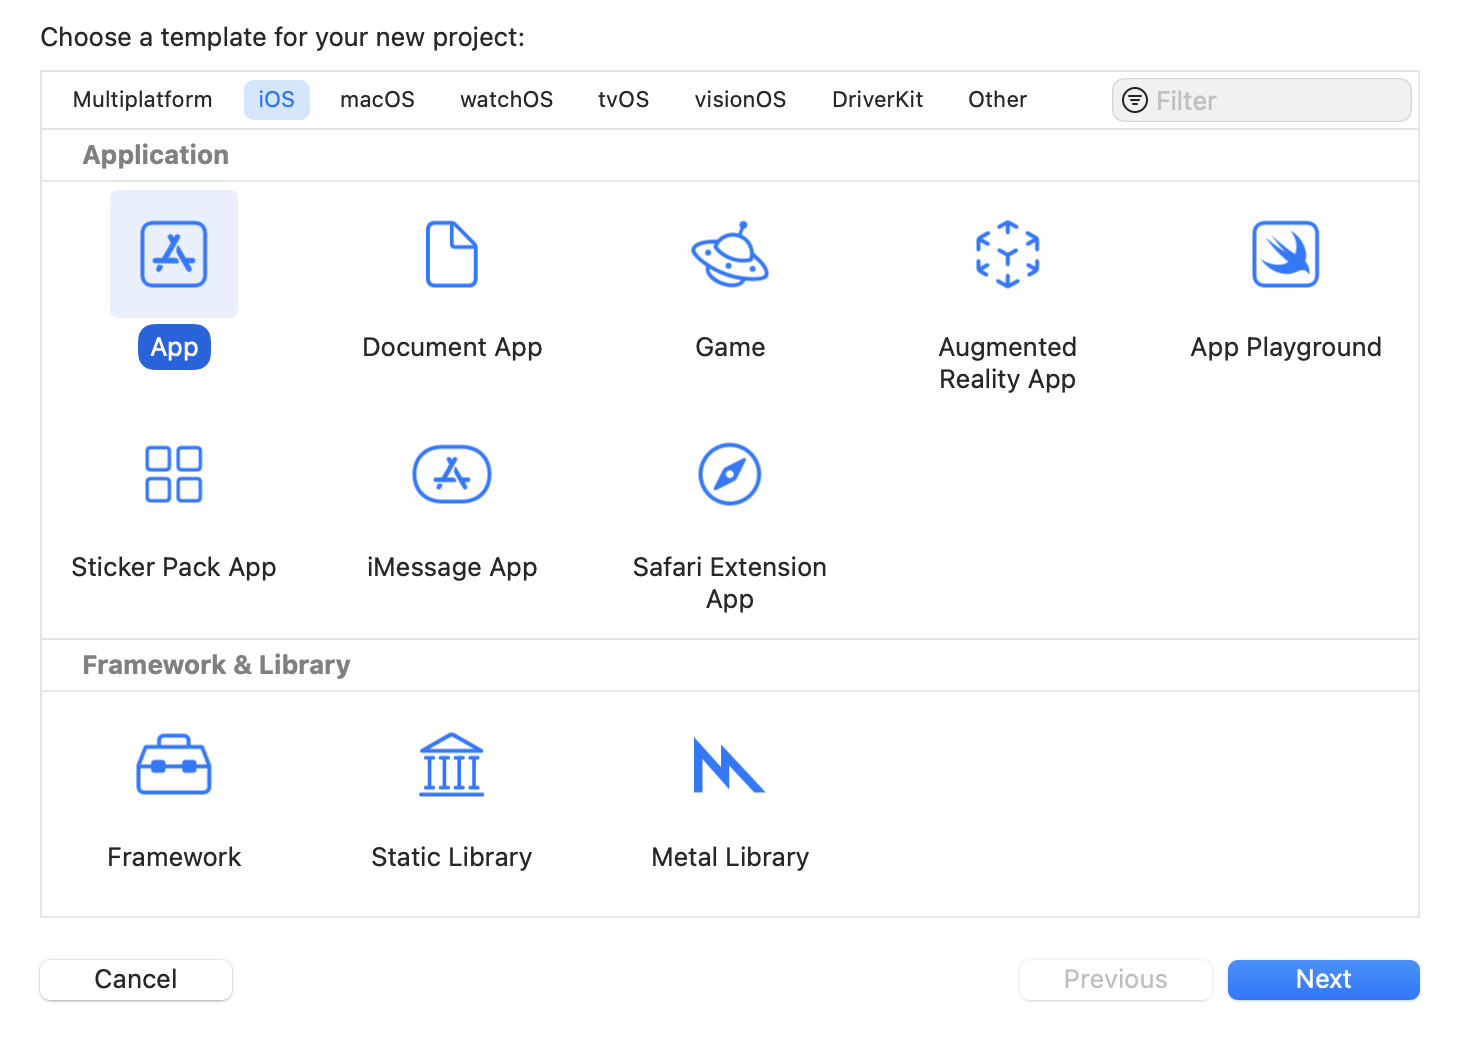
This template generates a barebones iOS app with a single screen. Perfect for building the Turbo Native app on top of.
On the next screen of the wizard, enter or select the following details:
- Product Name: Turbo Native
- Team: None
- Organization Identifier: com.example
- Interface: Storyboard
- Language: Swift
- Storage: None
- Include Tests: (unchecked)
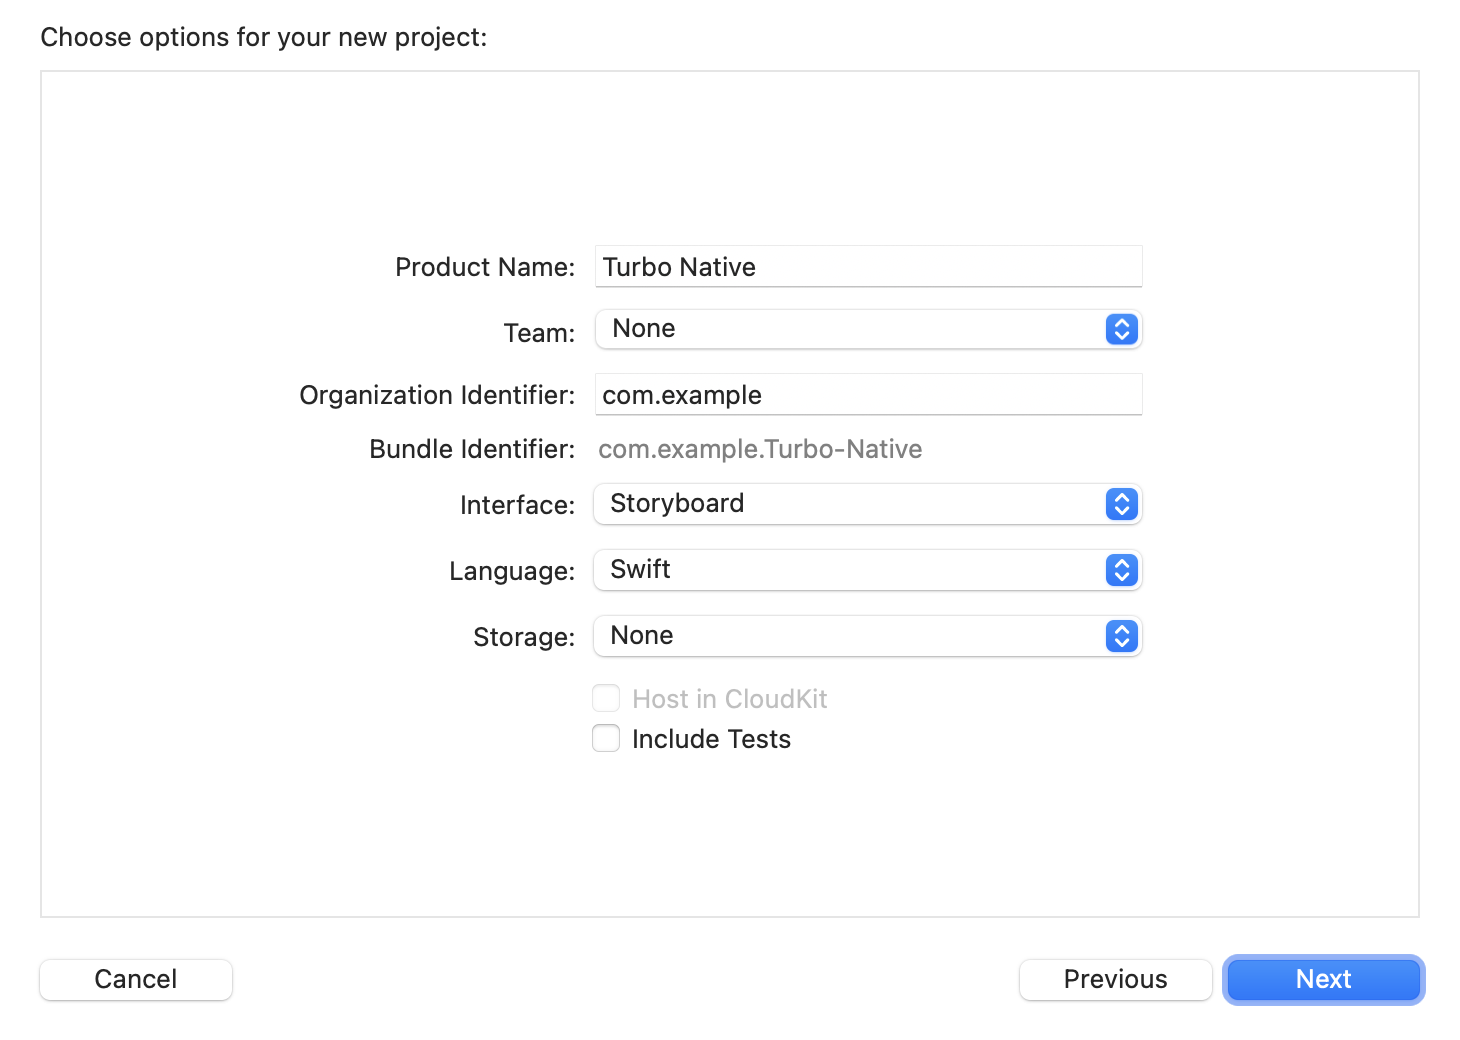
Product Name is the name of the app user’s see when they install it on their device.
You can select a Team to automatically sign your code before releasing the app to the App Store.
Organization Identifier is how the app is uniquely identified in the App Store but won’t be shown to users.
For Interface we are using the traditional Storyboard option instead of SwiftUI. There are still some limitations in SwiftUI navigation that make getting it to work with Turbo Native a little clunky.
Finally, we want to use Swift for the Language and don’t care about persisting anything to the device (select None for Storage).
On the next screen select a location to store your project then click Create.
Alright, you’ve got a brand new iOS app! Now let’s add the Turbo Native dependency.
Add the Turbo Native Swift Package
Swift packages are a lot like gems in Ruby. But instead of bundler we can use the Swift Package Manager built into Xcode to manage our dependencies.
In Xcode click File → Add Package Dependencies…
In the search bar in the upper right enter https://github.com/hotwired/turbo-ios.
Switch the Dependency Rule option to Branch and enter turbo-navigator.
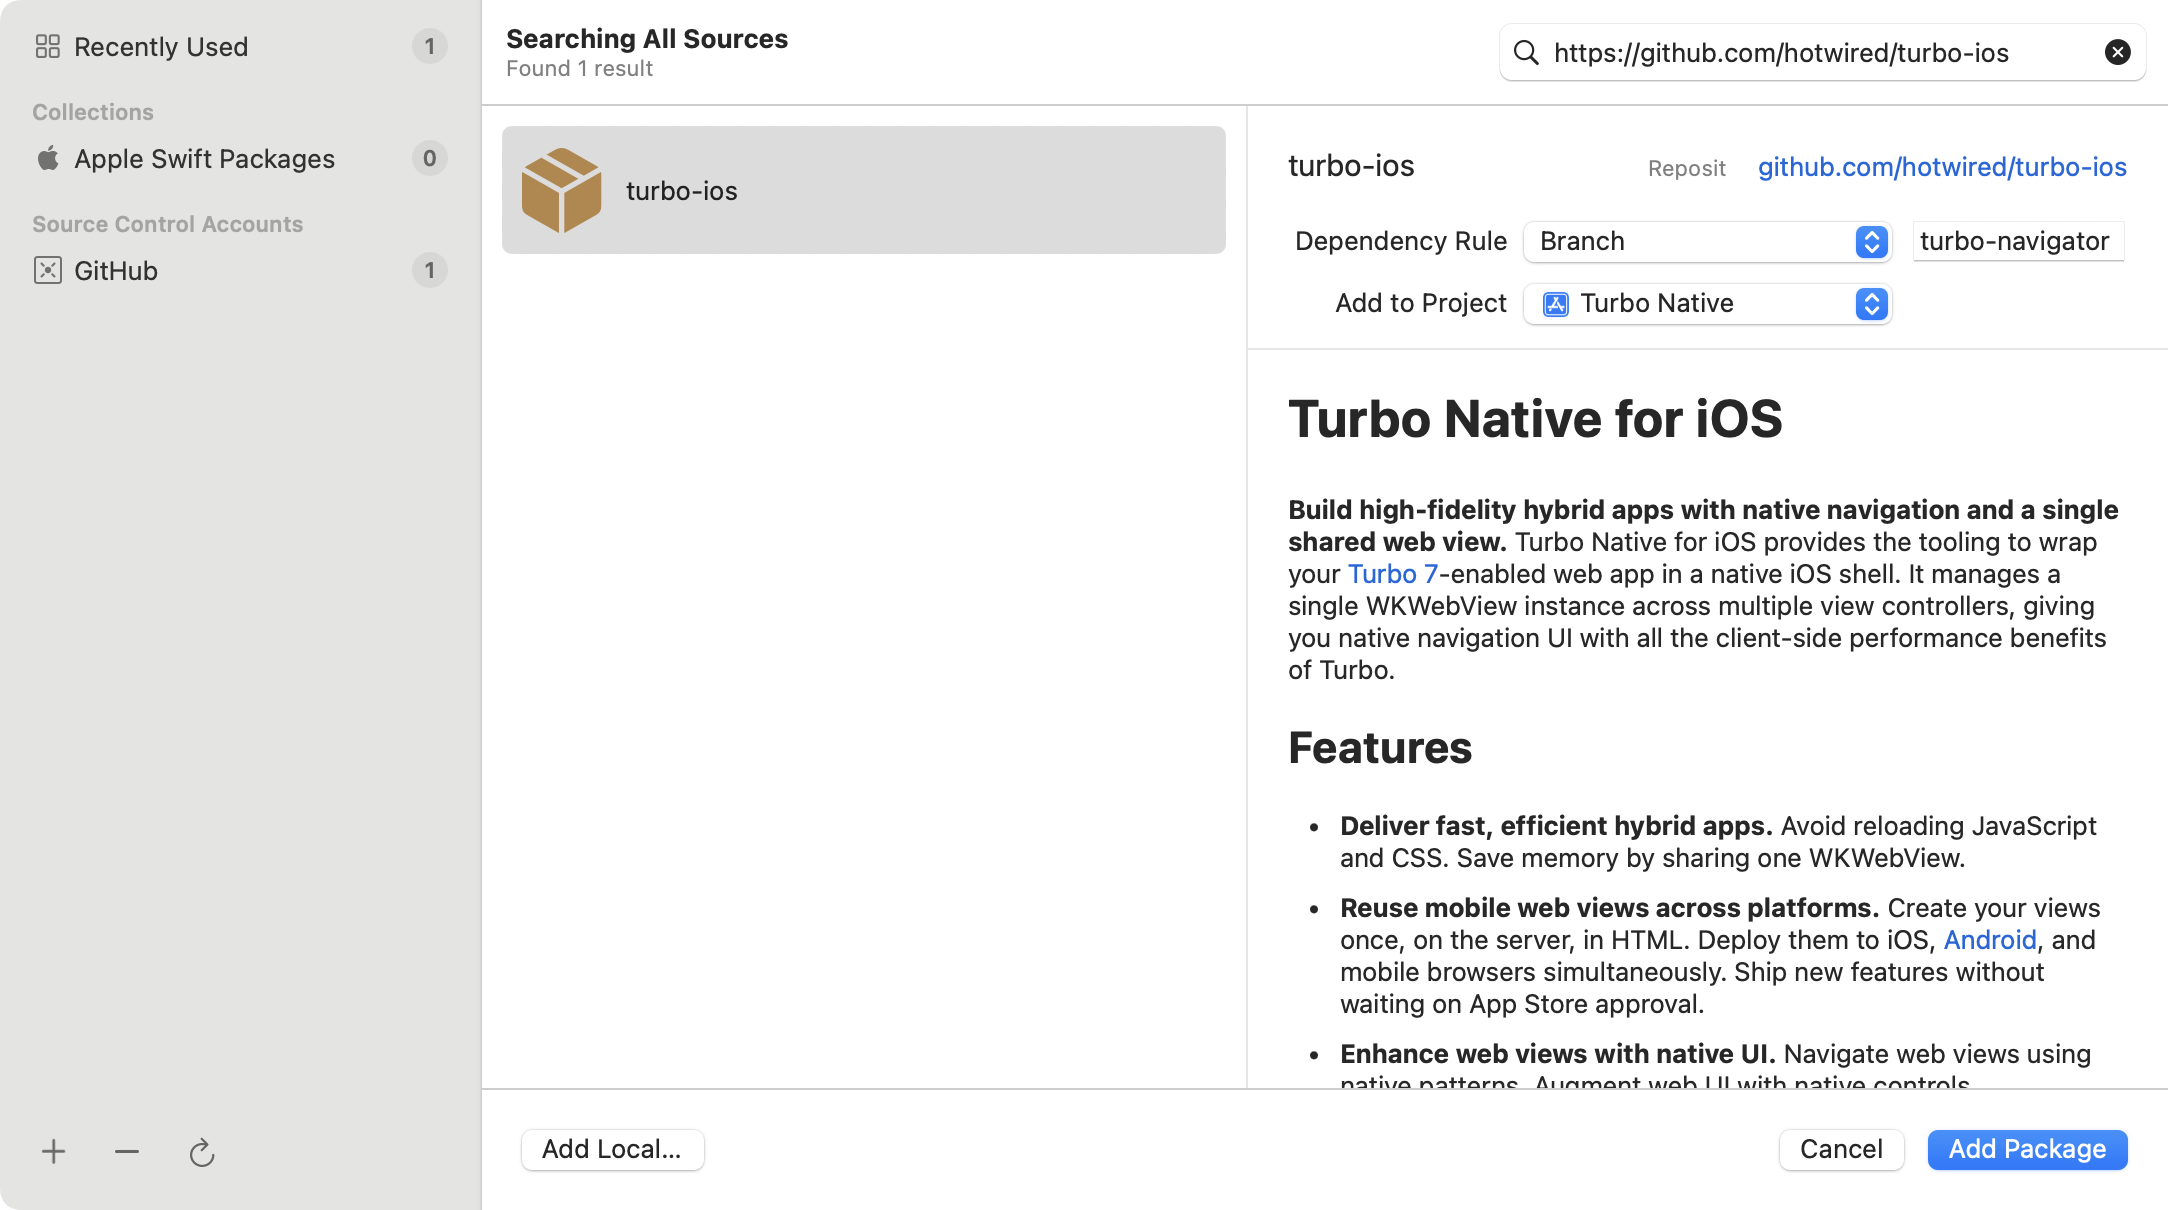
Click Add Package in the bottom right then Add Package again on the next screen.
We point to the turbo-navigator branch instead of an official release because Turbo Native iOS is going through a big upgrade. The code in this branch drastically simplifies the usage of the library and makes it easier for new developers to get started. Myself and the other maintainers recommend starting new projects with this branch - moving forward it will be the default way of using the library.
Up next we want to kick off the Turbo Native integration and visit the homepage of the demo server.
Integrate Turbo Native
Double-click SceneDelegate from the left pane to open the file. Here is where we will integrate Turbo Native with the app.
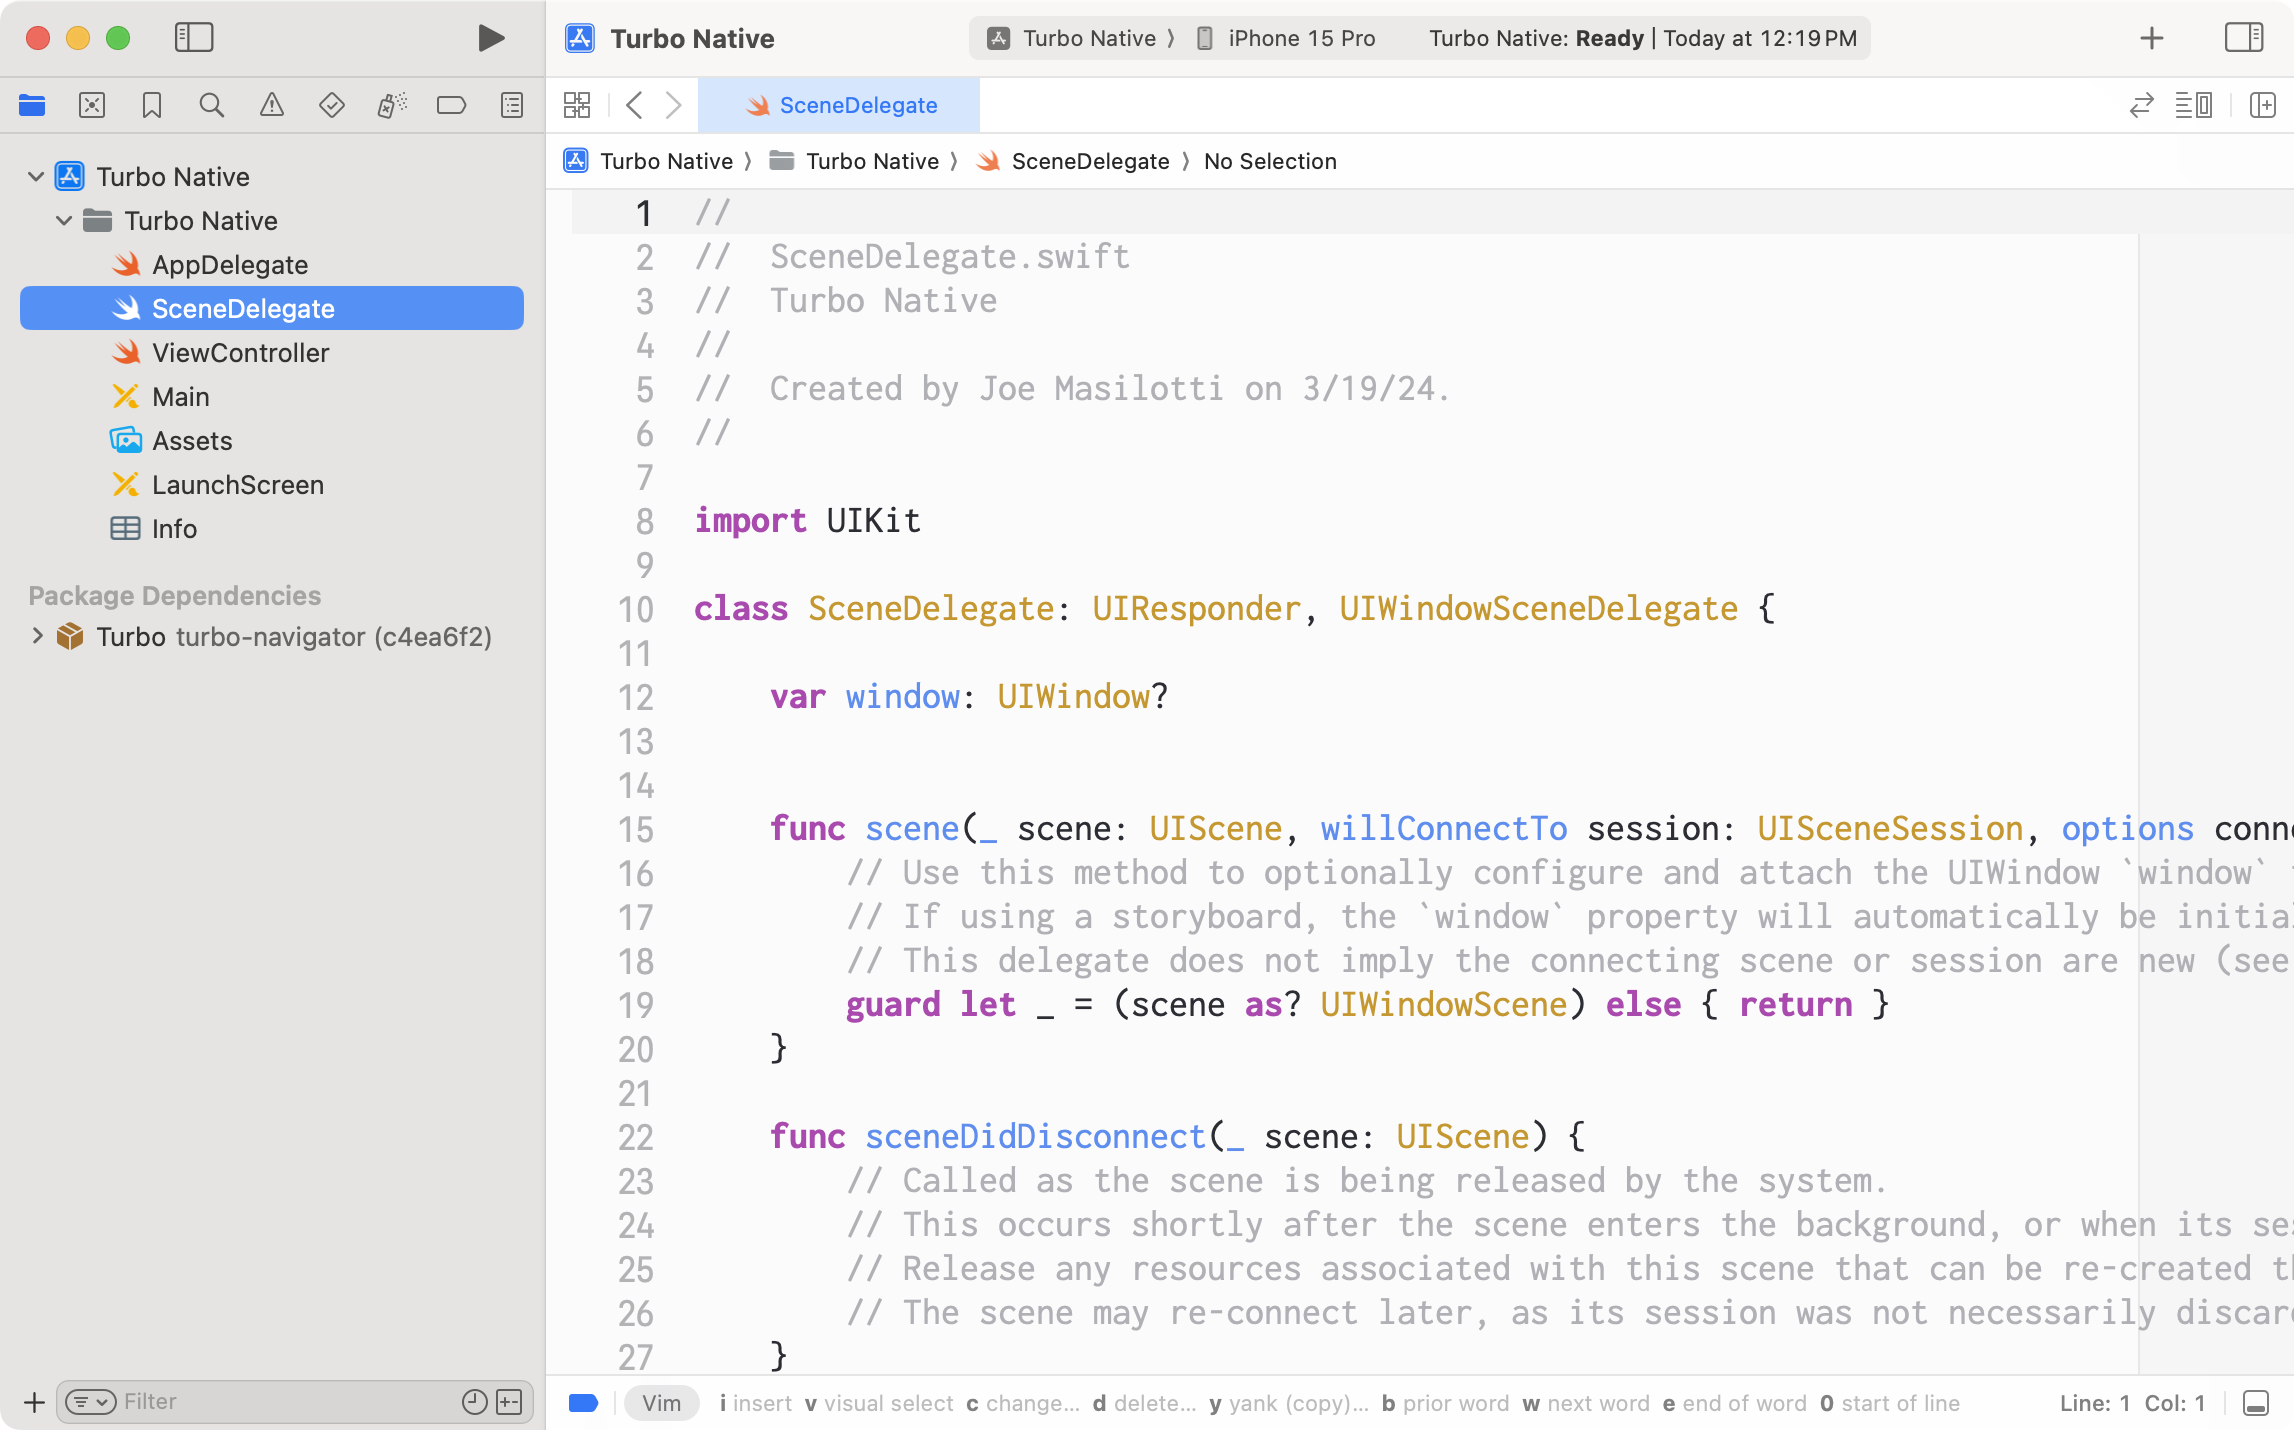
Delete all the comments from the file. Then, delete all the functions inside of this class except the first one. You’ll be left with the following:
import UIKit

class SceneDelegate: UIResponder, UIWindowSceneDelegate {
    var window: UIWindow?

    func scene(_ scene: UIScene, willConnectTo session: UISceneSession, options connectionOptions: UIScene.ConnectionOptions) {
        guard let _ = (scene as? UIWindowScene) else { return }
    }
}
This remaining function will be called when the app launches - the perfect place to kick off our Turbo Native integration.
Before we do that we need access to the Turbo Native code. At the top of the file import the Turbo framework.
import Turbo // <---
import UIKit

class SceneDelegate: UIResponder, UIWindowSceneDelegate {
    var window: UIWindow?

    func scene(_ scene: UIScene, willConnectTo session: UISceneSession, options connectionOptions: UIScene.ConnectionOptions) {
        guard let _ = (scene as? UIWindowScene) else { return }
    }
}
Unlike Ruby, Swift requires explicit imports when referencing code. Swift for Ruby developers crash course is a good place to start if you want to learn more about the language.
After the import statements create a global variable named baseURL. This is the web address that the app will visit when launched. As mentioned earlier, we will use the demo server:
import Turbo
import UIKit

let baseURL = URL(string: "https://turbo-native-demo.glitch.me/")! // <---

class SceneDelegate: UIResponder, UIWindowSceneDelegate {
    var window: UIWindow?

    func scene(_ scene: UIScene, willConnectTo session: UISceneSession, options connectionOptions: UIScene.ConnectionOptions) {
        guard let _ = (scene as? UIWindowScene) else { return }
    }
}
URL(string:) returns an optional value in Swift. In Swift, variables that can be nil must be unwrapped before using them. The explanation point at the end of the URL initializer will force unwrap this URL, changing it from an optional to a concrete URL.
Next, create a TurboNavigator property in SceneDelegate. This is your interaction point with Turbo Native - the navigator handles all of the magic of presenting screens, handling errors, and more.
import Turbo
import UIKit

let baseURL = URL(string: "https://turbo-native-demo.glitch.me/")!

class SceneDelegate: UIResponder, UIWindowSceneDelegate {
    var window: UIWindow?

    private let navigator = TurboNavigator() // <---

    func scene(_ scene: UIScene, willConnectTo session: UISceneSession, options connectionOptions: UIScene.ConnectionOptions) {
        guard let _ = (scene as? UIWindowScene) else { return }
    }
}
After the guard statement, inside the function, assign the navigator’s rootViewController to the window, like so:
import Turbo
import UIKit

let baseURL = URL(string: "https://turbo-native-demo.glitch.me/")!

class SceneDelegate: UIResponder, UIWindowSceneDelegate {
    var window: UIWindow?

    private let navigator = TurboNavigator()

    func scene(_ scene: UIScene, willConnectTo session: UISceneSession, options connectionOptions: UIScene.ConnectionOptions) {
        guard let _ = (scene as? UIWindowScene) else { return }
        window?.rootViewController = navigator.rootViewController // <---
    }
}
In iOS a view controller manages the state, presentation, and layout of a screen. Every time a link is tapped Turbo Navigator pushes a new view controller onto its stack. Here we assign the root view controller of the window to that of the navigator. This lets Turbo Navigator take complete control of what gets displayed on the screen and do its thing. Perfect!
Finally, tell the navigator to visit the baseURL.
import Turbo
import UIKit

let baseURL = URL(string: "https://turbo-native-demo.glitch.me/")!

class SceneDelegate: UIResponder, UIWindowSceneDelegate {
    var window: UIWindow?

    private let navigator = TurboNavigator()

    func scene(_ scene: UIScene, willConnectTo session: UISceneSession, options connectionOptions: UIScene.ConnectionOptions) {
        guard let _ = (scene as? UIWindowScene) else { return }
        window?.rootViewController = navigator.rootViewController
        navigator.route(baseURL) // <---
    }
}
Build and run the app via Product → Run. After a few second delay you’ll see your first Turbo Native app in the simulator. Nice work!
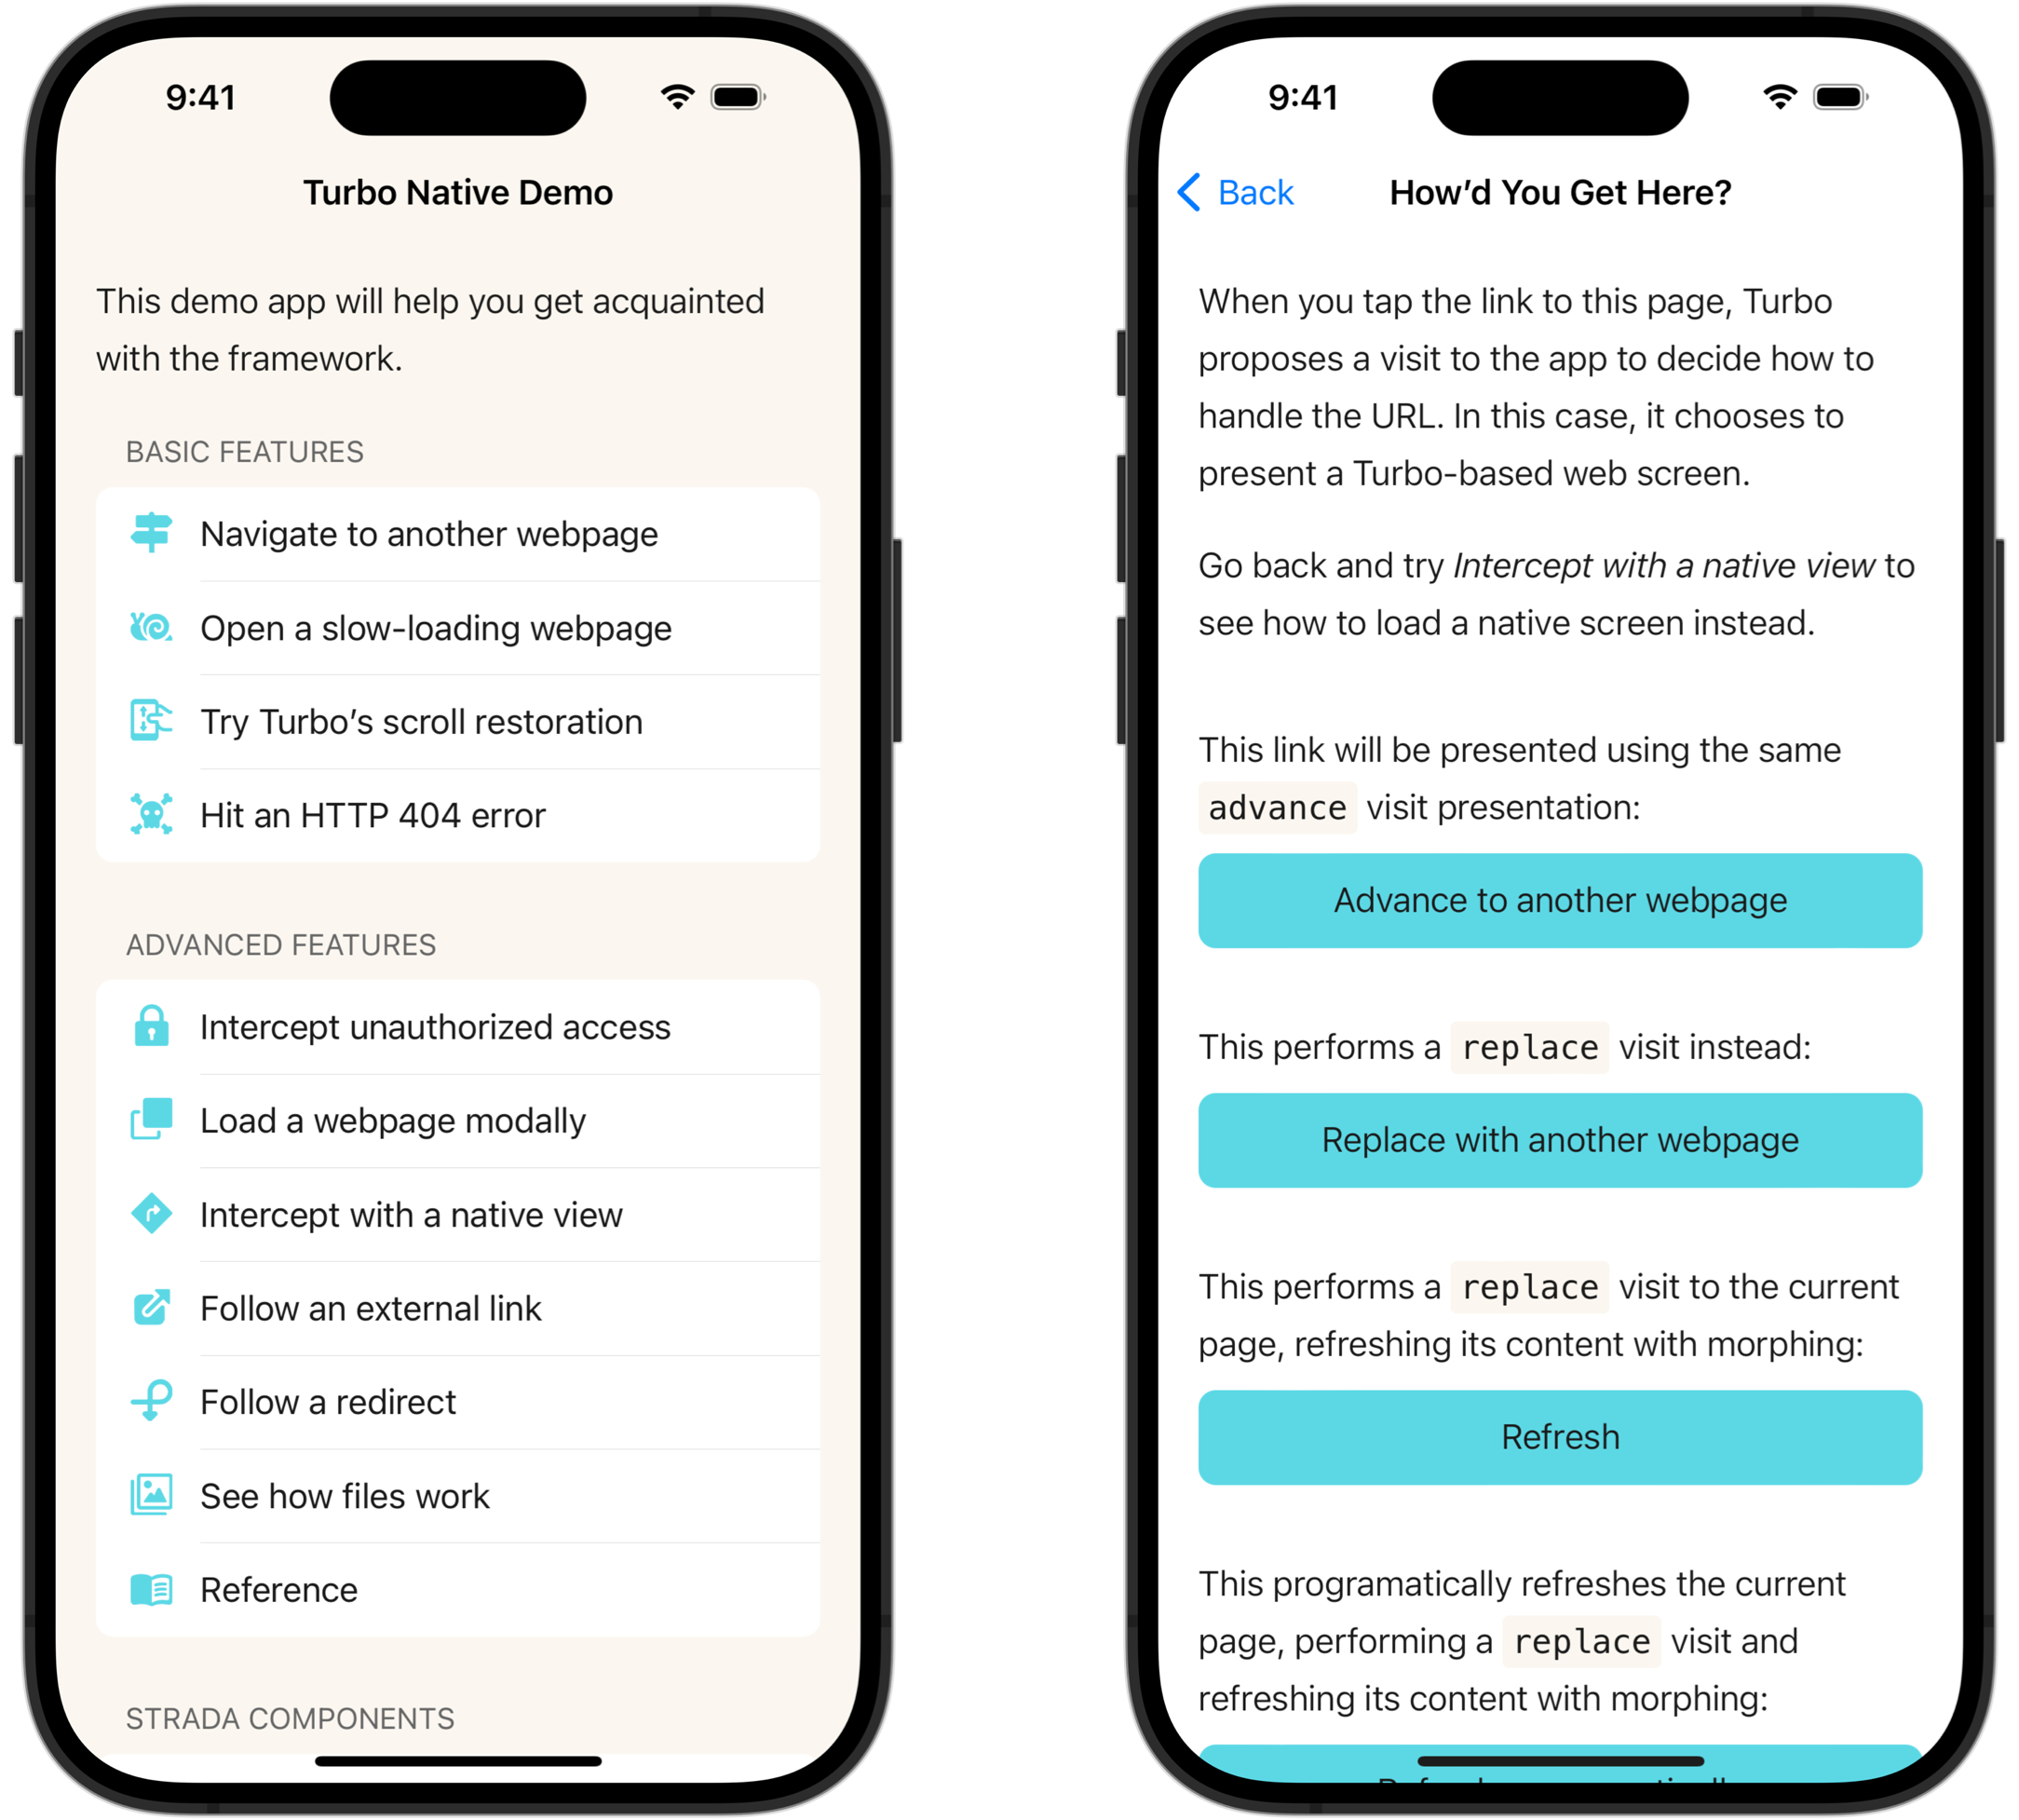
Tap around and notice how screens are pushed and popped with animation. Play around with the different links to get a feel for more of how Turbo Native works.
But remember, this server assumes the app has all the code from the Turbo Native iOS Demo project. So not everything will work with your codebase: the Strada components, modals, or native screens.
Next steps for iOS
Now that you have a barebones iOS app, what steps can you take to bring it to the next level?
First, I recommend running against a local server. Update the baseURL variable to point to your own Rails app and see how much works. And if anything broke.
Next, add a native screen or a component powered by Strada. A great place to get started on these is to review the demo app and read the through the documentation on GitHub. Or, check out my step-by-step tutorial on how to add Strada to turbo-ios apps.
With the iOS app in a good spot let’s switch gears and do the same for Android.
Build a Turbo Native Android app
First, download the latest version of Android Studio. This guide and the screenshots reference Android Studio Iguana.
Once downloaded and installed, open Android Studio and wait for any Android SDKs to finish downloading.
A heads up that the Android app requires quite a bit more work than the iOS one; there’s a good chunk of boilerplate you need to build to get everything working. Here’s what you’ll do:
- Create a new Android Studio project
- Add the Turbo Native Gradle dependency
- Create a navigation fragment
- Update the activity
- Create a web fragment
- Create a path configuration
Create a new Android Studio project
In Android Studio click File → New → New Project…
Select the Phone and Tablets category on the left and the Empty Views Activity template. Click Next.
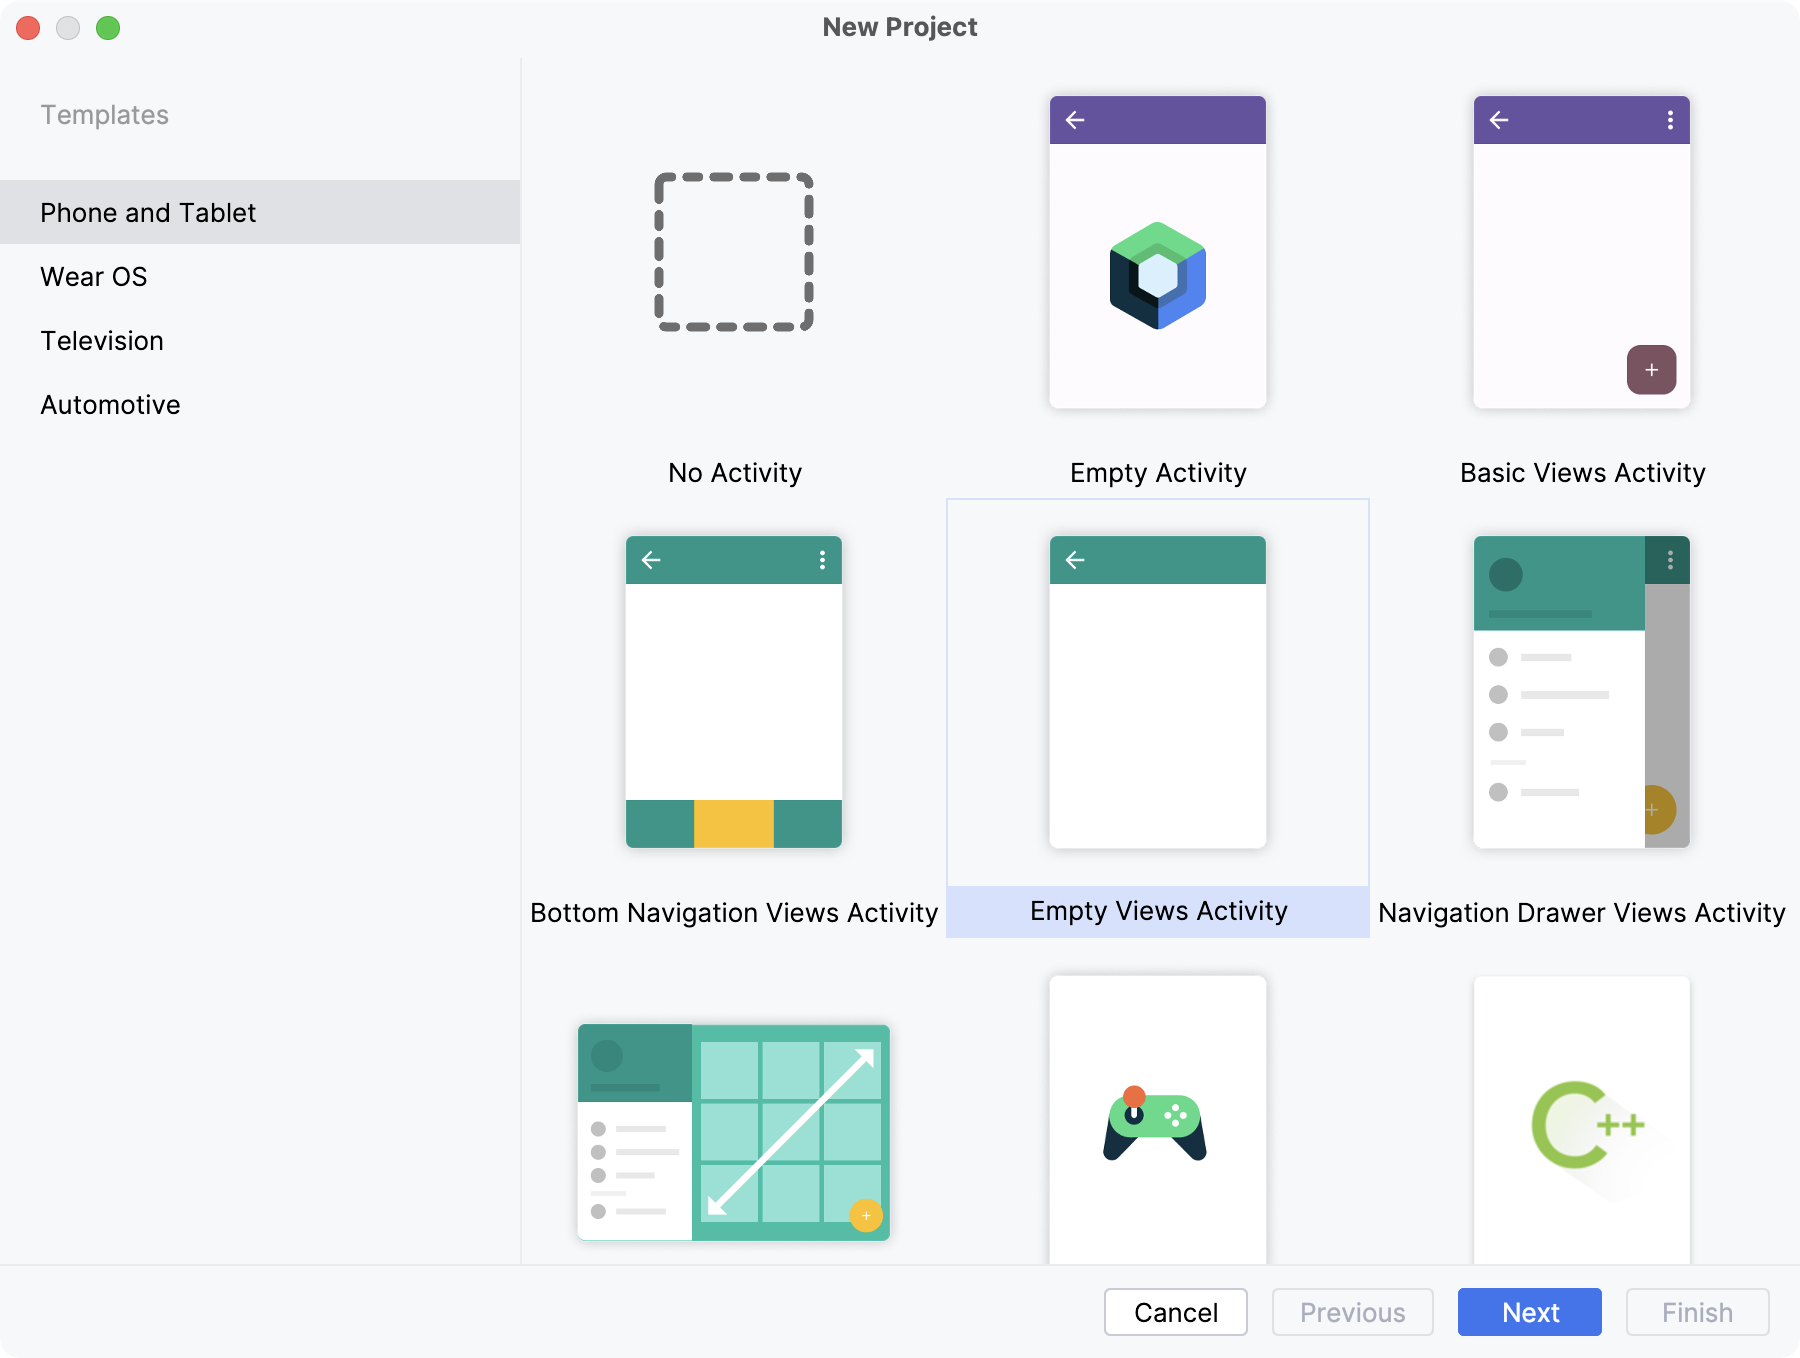
Like the template used for iOS, this one gives you a barebones Android app with a single screen.
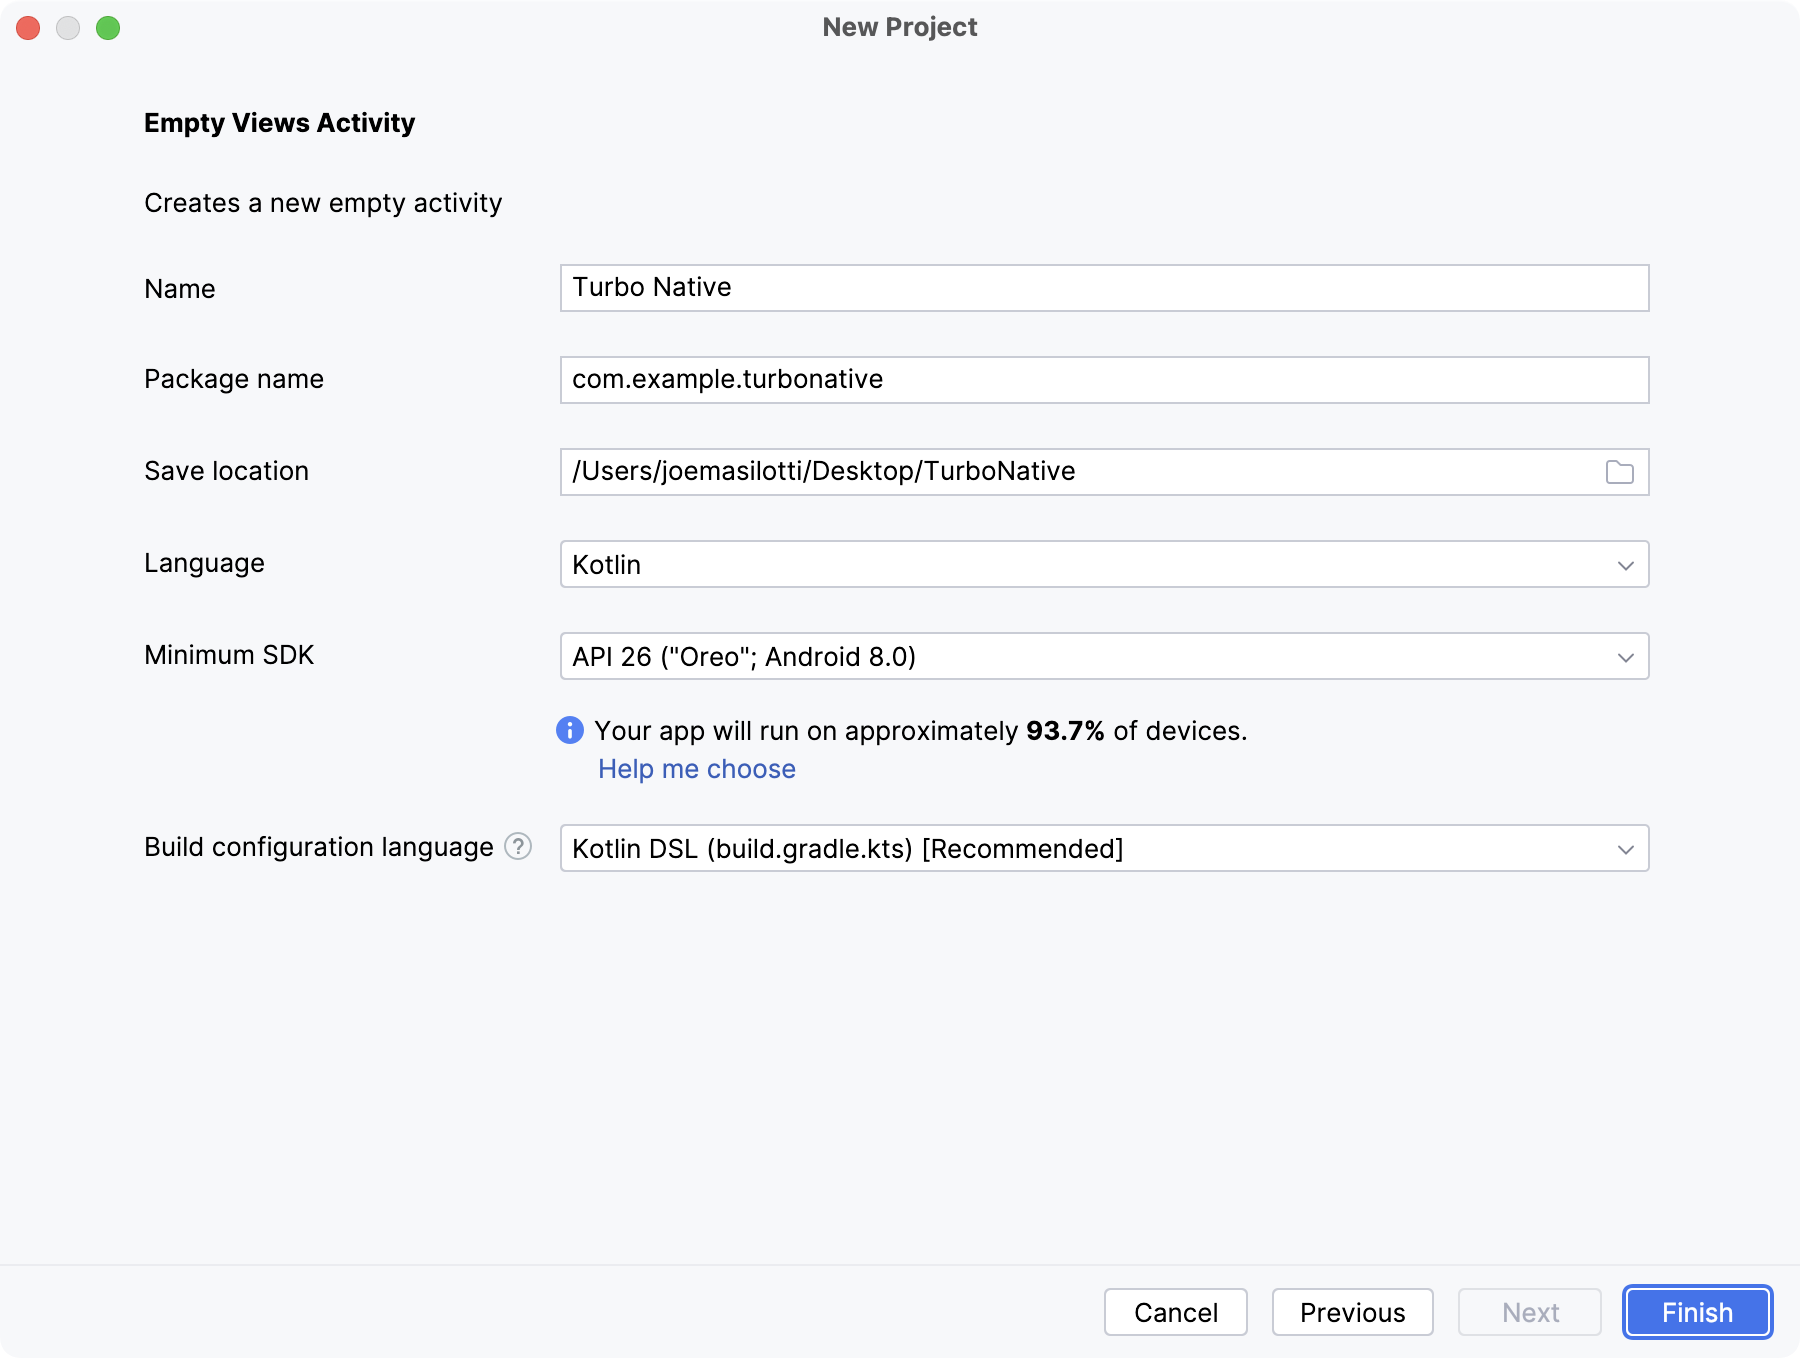
On the next screen of the wizard, enter or select the following details and click Finish:
- Name: Turbo Native
- Package Name: com.example.turbonative
- Save location: (where you want store the project)
- Minimum SDK: API 26 (“Oreo”; Android 8.0)
- Build configuration language: Kotlin DSL (build.gradle.kts) [Recommended]
Name is the title of the app a user sees when they install it on their device.
Package name is like Organization Identifier on iOS - it’s how the app is uniquely identified in Google Play and won’t be shown to users.
Turbo Android requires API 26 so we choose that as our Minimum SDK.
Finally, we’ll use the modern and recommended Kotlin DSL for the Build configuration language.
And there you have it, a brand new Android app! Let’s add the Turbo Native dependency next.
Add the Turbo Native Gradle dependency
From the pane on the left expand the chevron next to Gradle Scripts and double-click build.gradle.kts (Module :app) to open it. Make sure you open the one for the module and not the project.
This file lays out a bunch of configuration for Android apps, including dependencies. Scroll to the bottom and add the Turbo Native dependency after the last implementation() already there.
// ...

dependencies {

    implementation(libs.androidx.core.ktx)
    implementation(libs.androidx.appcompat)
    implementation(libs.material)
    implementation(libs.androidx.activity)
    implementation(libs.androidx.constraintlayout)
    implementation("dev.hotwire:turbo:7.1.0") // <---
    testImplementation(libs.junit)
    androidTestImplementation(libs.androidx.junit)
    androidTestImplementation(libs.androidx.espresso.core)
}
After adding the dependency, Android Studio will show a blue bar towards the top of the screen letting you know the project needs to be synced.
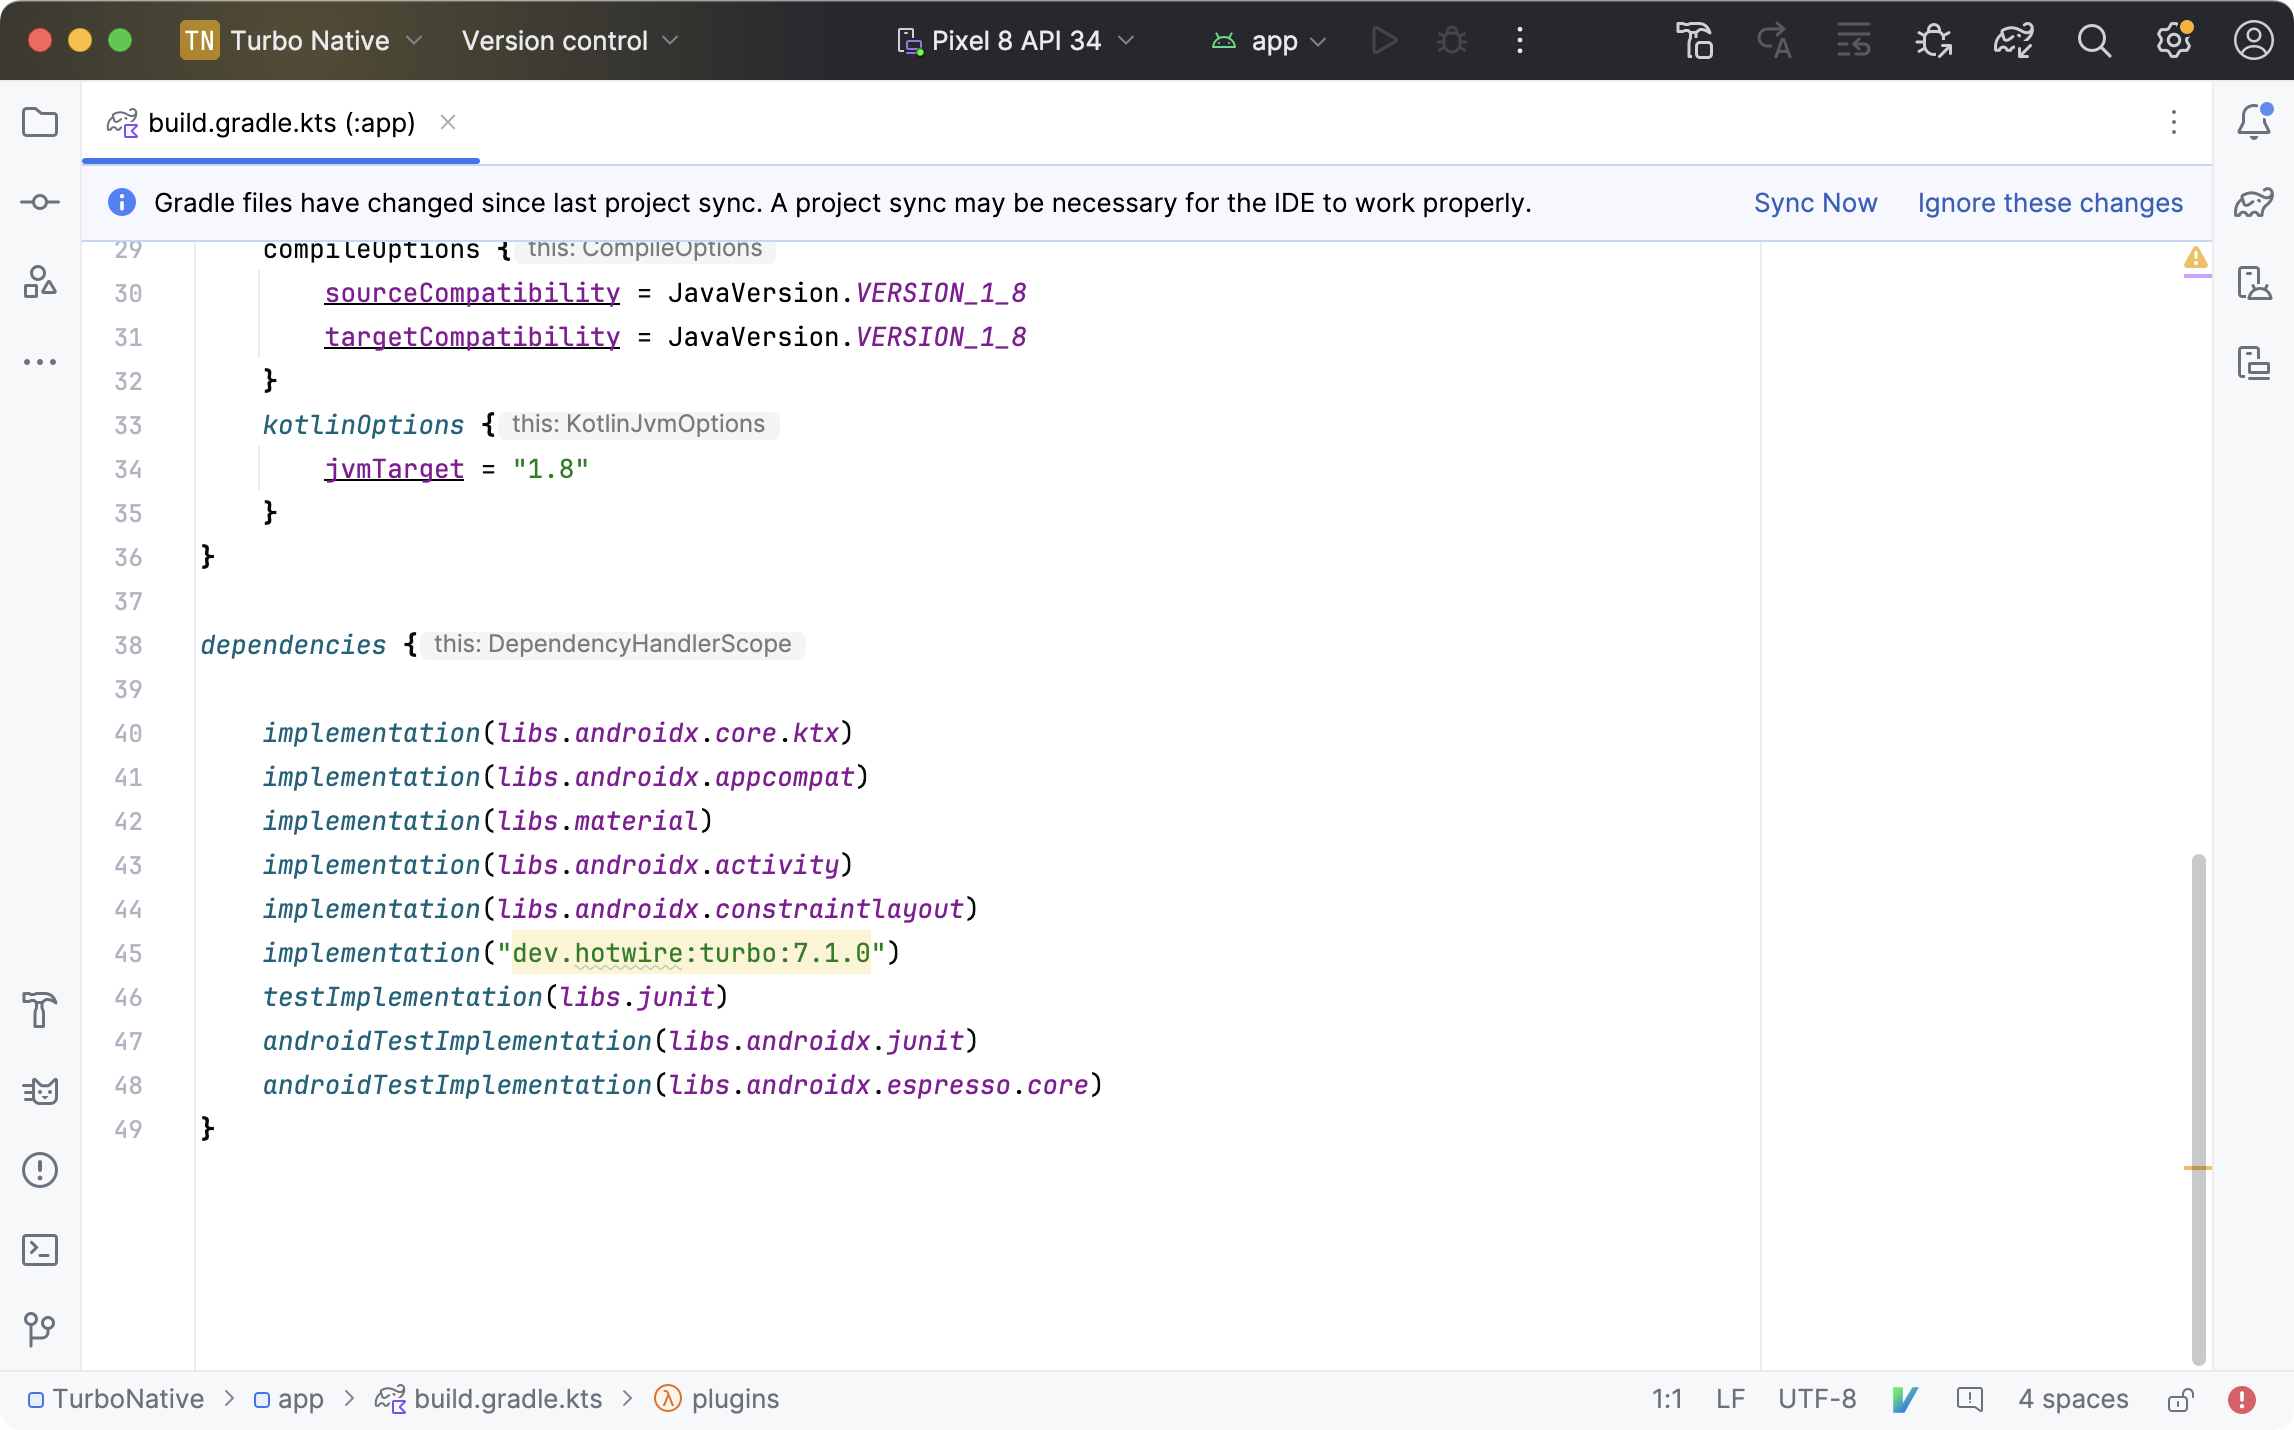
Click the Sync Now button on the right of the bar to have Android Studio download and integrate the new dependency into the project.
Next, open AndroidManifest.xml from the panel on the left by expanding app then manifests and double-clicking the file.
Add the following permission to allow the app communicate with the internet. The app wouldn’t do much without access to the server!
<?xml version="1.0" encoding="utf-8"?>
<manifest xmlns:android="http://schemas.android.com/apk/res/android"
    xmlns:tools="http://schemas.android.com/tools">

    <!-- Add the following line: --->
    <uses-permission android:name="android.permission.INTERNET"/>

    <application
        android:allowBackup="true"
        android:dataExtractionRules="@xml/data_extraction_rules"
        android:fullBackupContent="@xml/backup_rules"
        android:icon="@mipmap/ic_launcher"
        android:label="@string/app_name"
        android:roundIcon="@mipmap/ic_launcher_round"
        android:supportsRtl="true"
        android:theme="@style/Theme.TurboNative"
        tools:targetApi="31">
        <activity
            android:name=".MainActivity"
            android:exported="true">
            <intent-filter>
                <action android:name="android.intent.action.MAIN" />

                <category android:name="android.intent.category.LAUNCHER" />
            </intent-filter>
        </activity>
    </application>

</manifest>
The Turbo Native dependency is in place. But we have a few pieces of boilerplate to add before we can start using the app.
Create a navigation fragment
Like iOS has view controllers, Android has fragments. And in modern Android development each screen usually maps 1:1 with a fragment. For Turbo Native to present a stack of screens we need to wrap them in a NavHostFragment.
From the panel on the left, expand app, kotlin+java, then com.example.turbonative.
Right-click com.example.turbonative and select New → Kotlin Class/File.
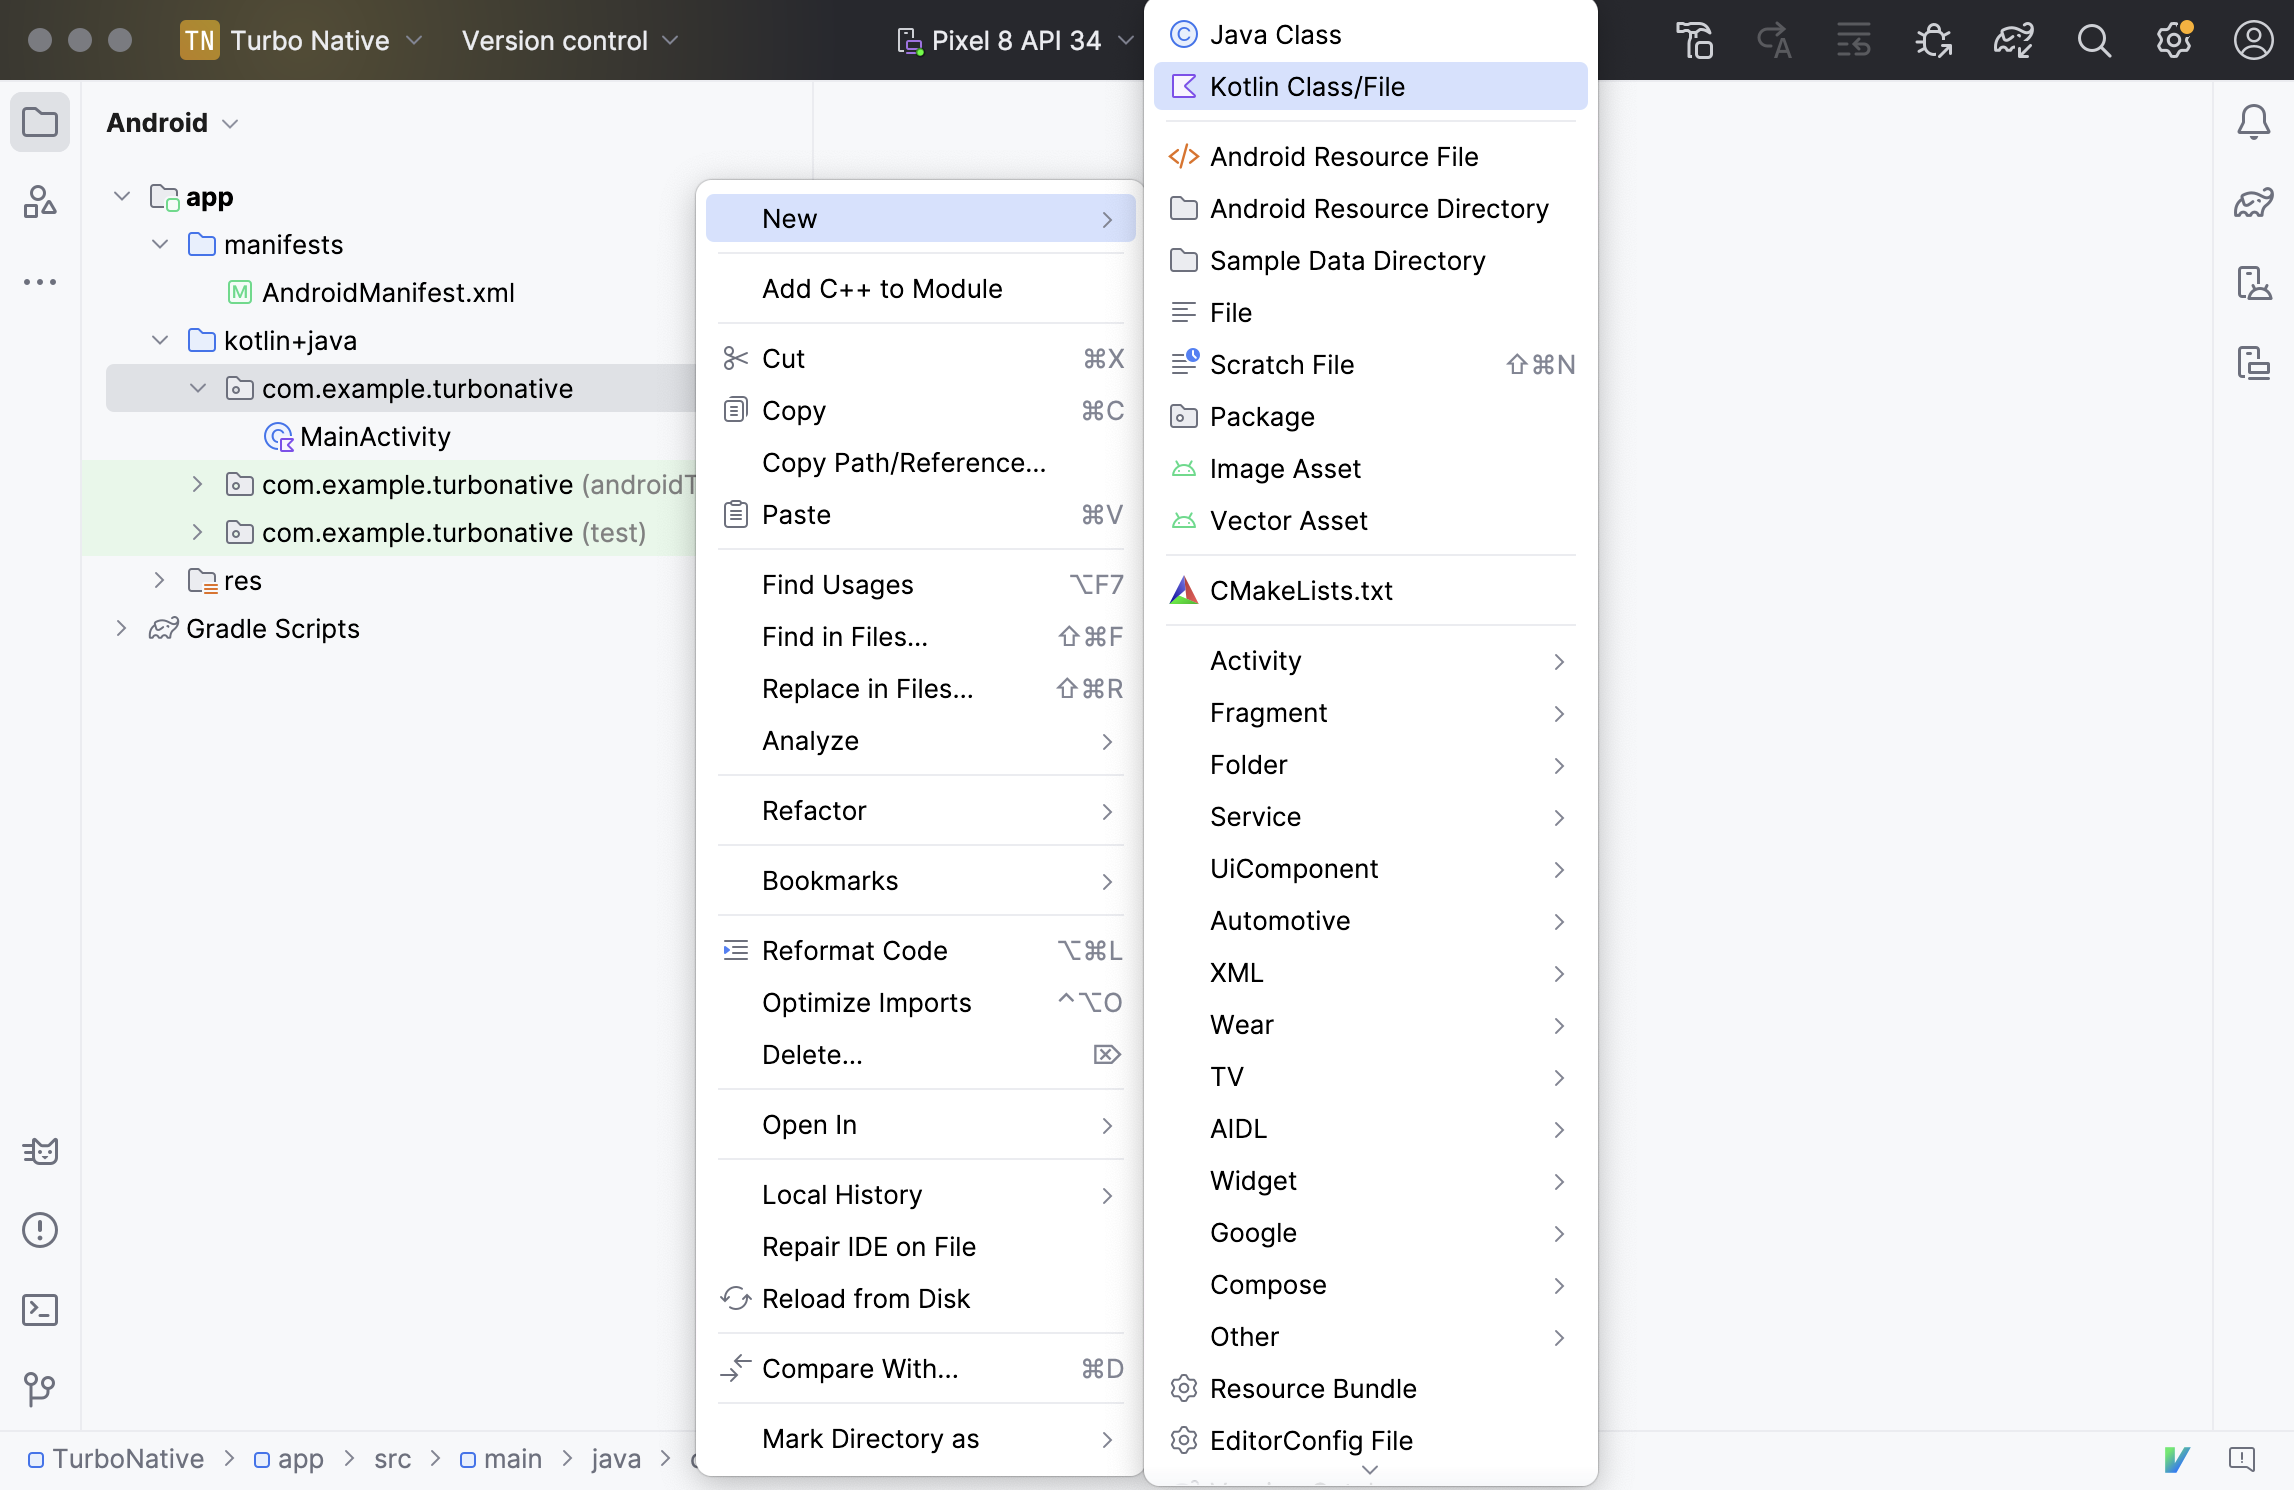
Enter MainSessionNavHostFragment and press Enter.
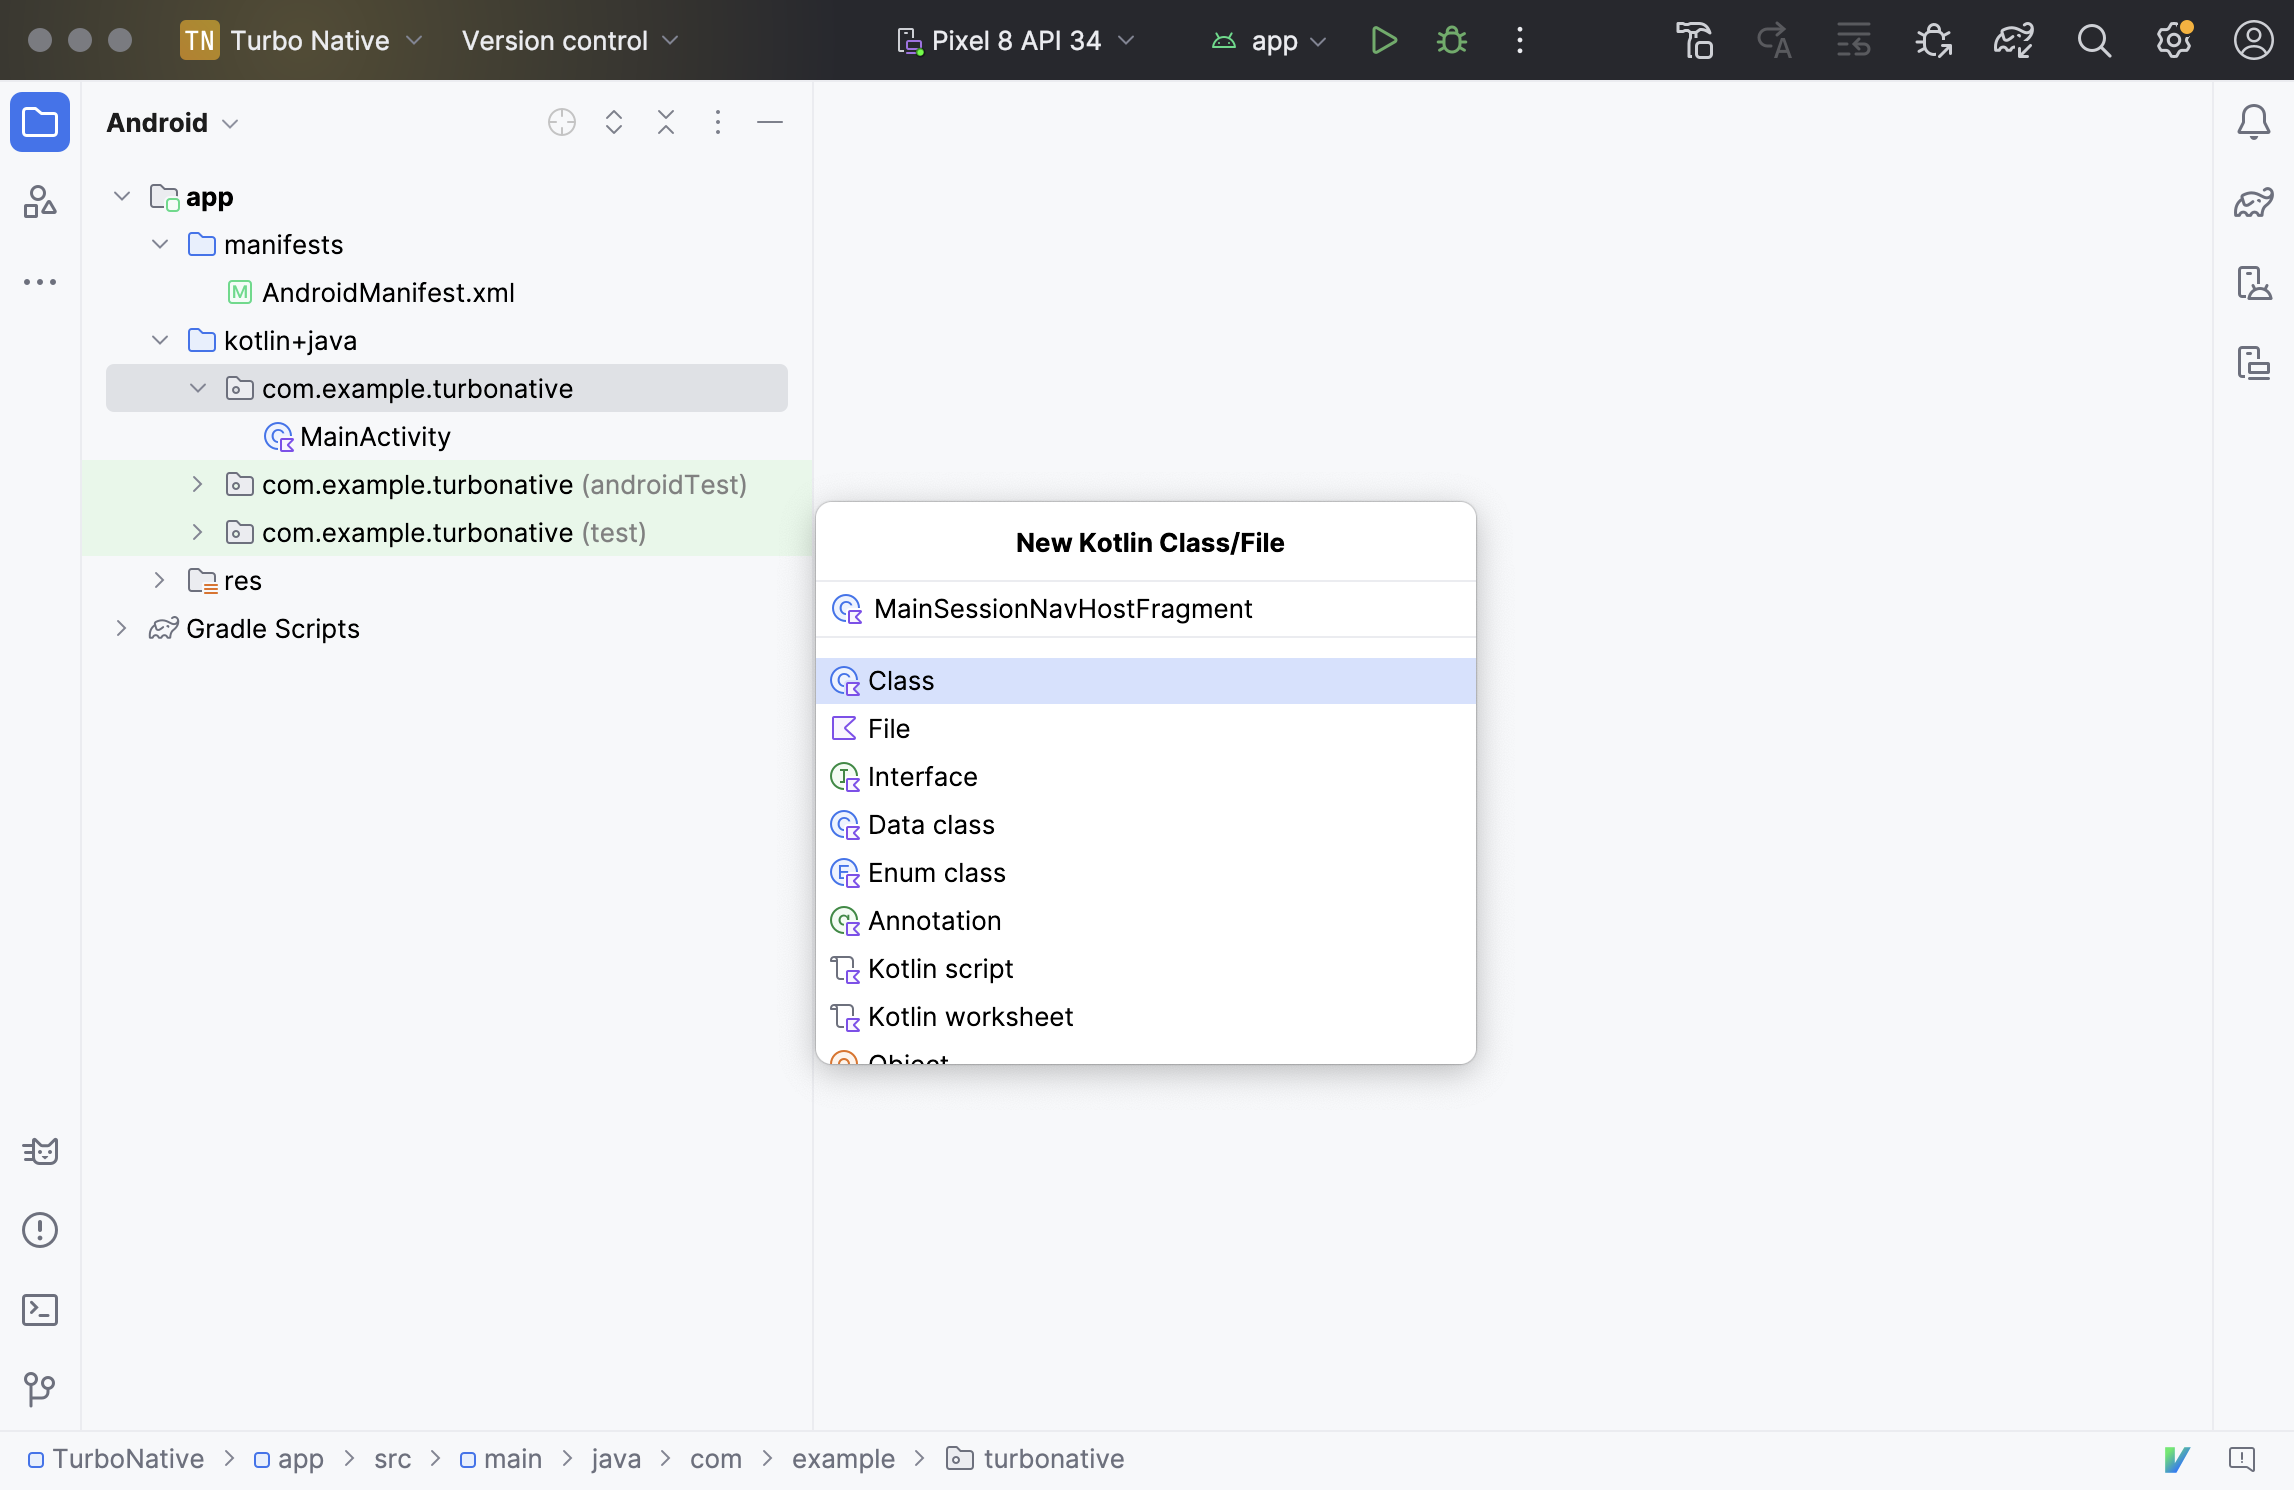
Android Studio will open the new file automatically.
Start by making this class inherit from TurboSessionNavHostFragment. Android Studio will automatically add the necessary import statement when you finish typing and press Enter.
package com.example.turbonative

import dev.hotwire.turbo.session.TurboSessionNavHostFragment // <---

class MainSessionNavHostFragment : TurboSessionNavHostFragment() { // <---
}
But the compiler isn’t happy. That red squiggle under MainSessionNavHostFragment means there’s an error we need to address.

TurboSessionNavHostFragment is an abstract class, requiring the developer (you!) to implement a few things for it to work.
Click on the red squiggle and press ⌥ + Enter. Then select “Implement members” from the dialog and click OK. Android Studio will add placeholders for each required property.
package com.example.turbonative

import androidx.fragment.app.Fragment
import dev.hotwire.turbo.config.TurboPathConfiguration
import dev.hotwire.turbo.session.TurboSessionNavHostFragment
import kotlin.reflect.KClass

class MainSessionNavHostFragment : TurboSessionNavHostFragment() {
    override val pathConfigurationLocation: TurboPathConfiguration.Location
        get() = TODO("Not yet implemented")
    override val registeredFragments: List<KClass<out Fragment>>
        get() = TODO("Not yet implemented")
    override val sessionName: String
        get() = TODO("Not yet implemented")
    override val startLocation: String
        get() = TODO("Not yet implemented")
}
First, address sessionName by setting the value to "main" like so:
// ...

class MainSessionNavHostFragment : TurboSessionNavHostFragment() {
    override val sessionName = "main"

    // ...
}
TurboSessionNavHostFragment uses the sessionName property to identify the web view session it uses under the hood. main is arbitrary, you can use whatever you’d like.
Next, set the startLocation to point to the Turbo Native Demo like in the iOS app:
// ...

class MainSessionNavHostFragment : TurboSessionNavHostFragment() {
    override val sessionName = "main"

    override val startLocation = "https://turbo-native-demo.glitch.me/"

    // ...
}
So far, MainSessionNavHostFragment should look like the following:
package com.example.turbonative

import androidx.fragment.app.Fragment
import dev.hotwire.turbo.config.TurboPathConfiguration
import dev.hotwire.turbo.session.TurboSessionNavHostFragment
import kotlin.reflect.KClass

class MainSessionNavHostFragment : TurboSessionNavHostFragment() {
    override val sessionName = "main"

    override val startLocation = "https://turbo-native-demo.glitch.me/"

    override val registeredFragments: List<KClass<out Fragment>>
        get() = TODO("Not yet implemented")

    override val pathConfigurationLocation: TurboPathConfiguration.Location
        get() = TODO("Not yet implemented")
}
Before addressing registeredFragments and pathConfigurationLocation we need to add a bit more code.
Update the activity
While modern Android apps usually have multiple fragments, they only have a single activity. Remember when we built the iOS app we used SceneDelegate as our entry point to the application? On Android we will do the same with MainActivity.
To align the activity with Turbo Native we need to update its view layout first. Expand app, res, then layout and double-click activity_main.xml.
You’ll be presented with a visual version of the layout. But we need to edit the underlying XML directly.
Click on the Code icon represented by three horizontal lines in the upper right.
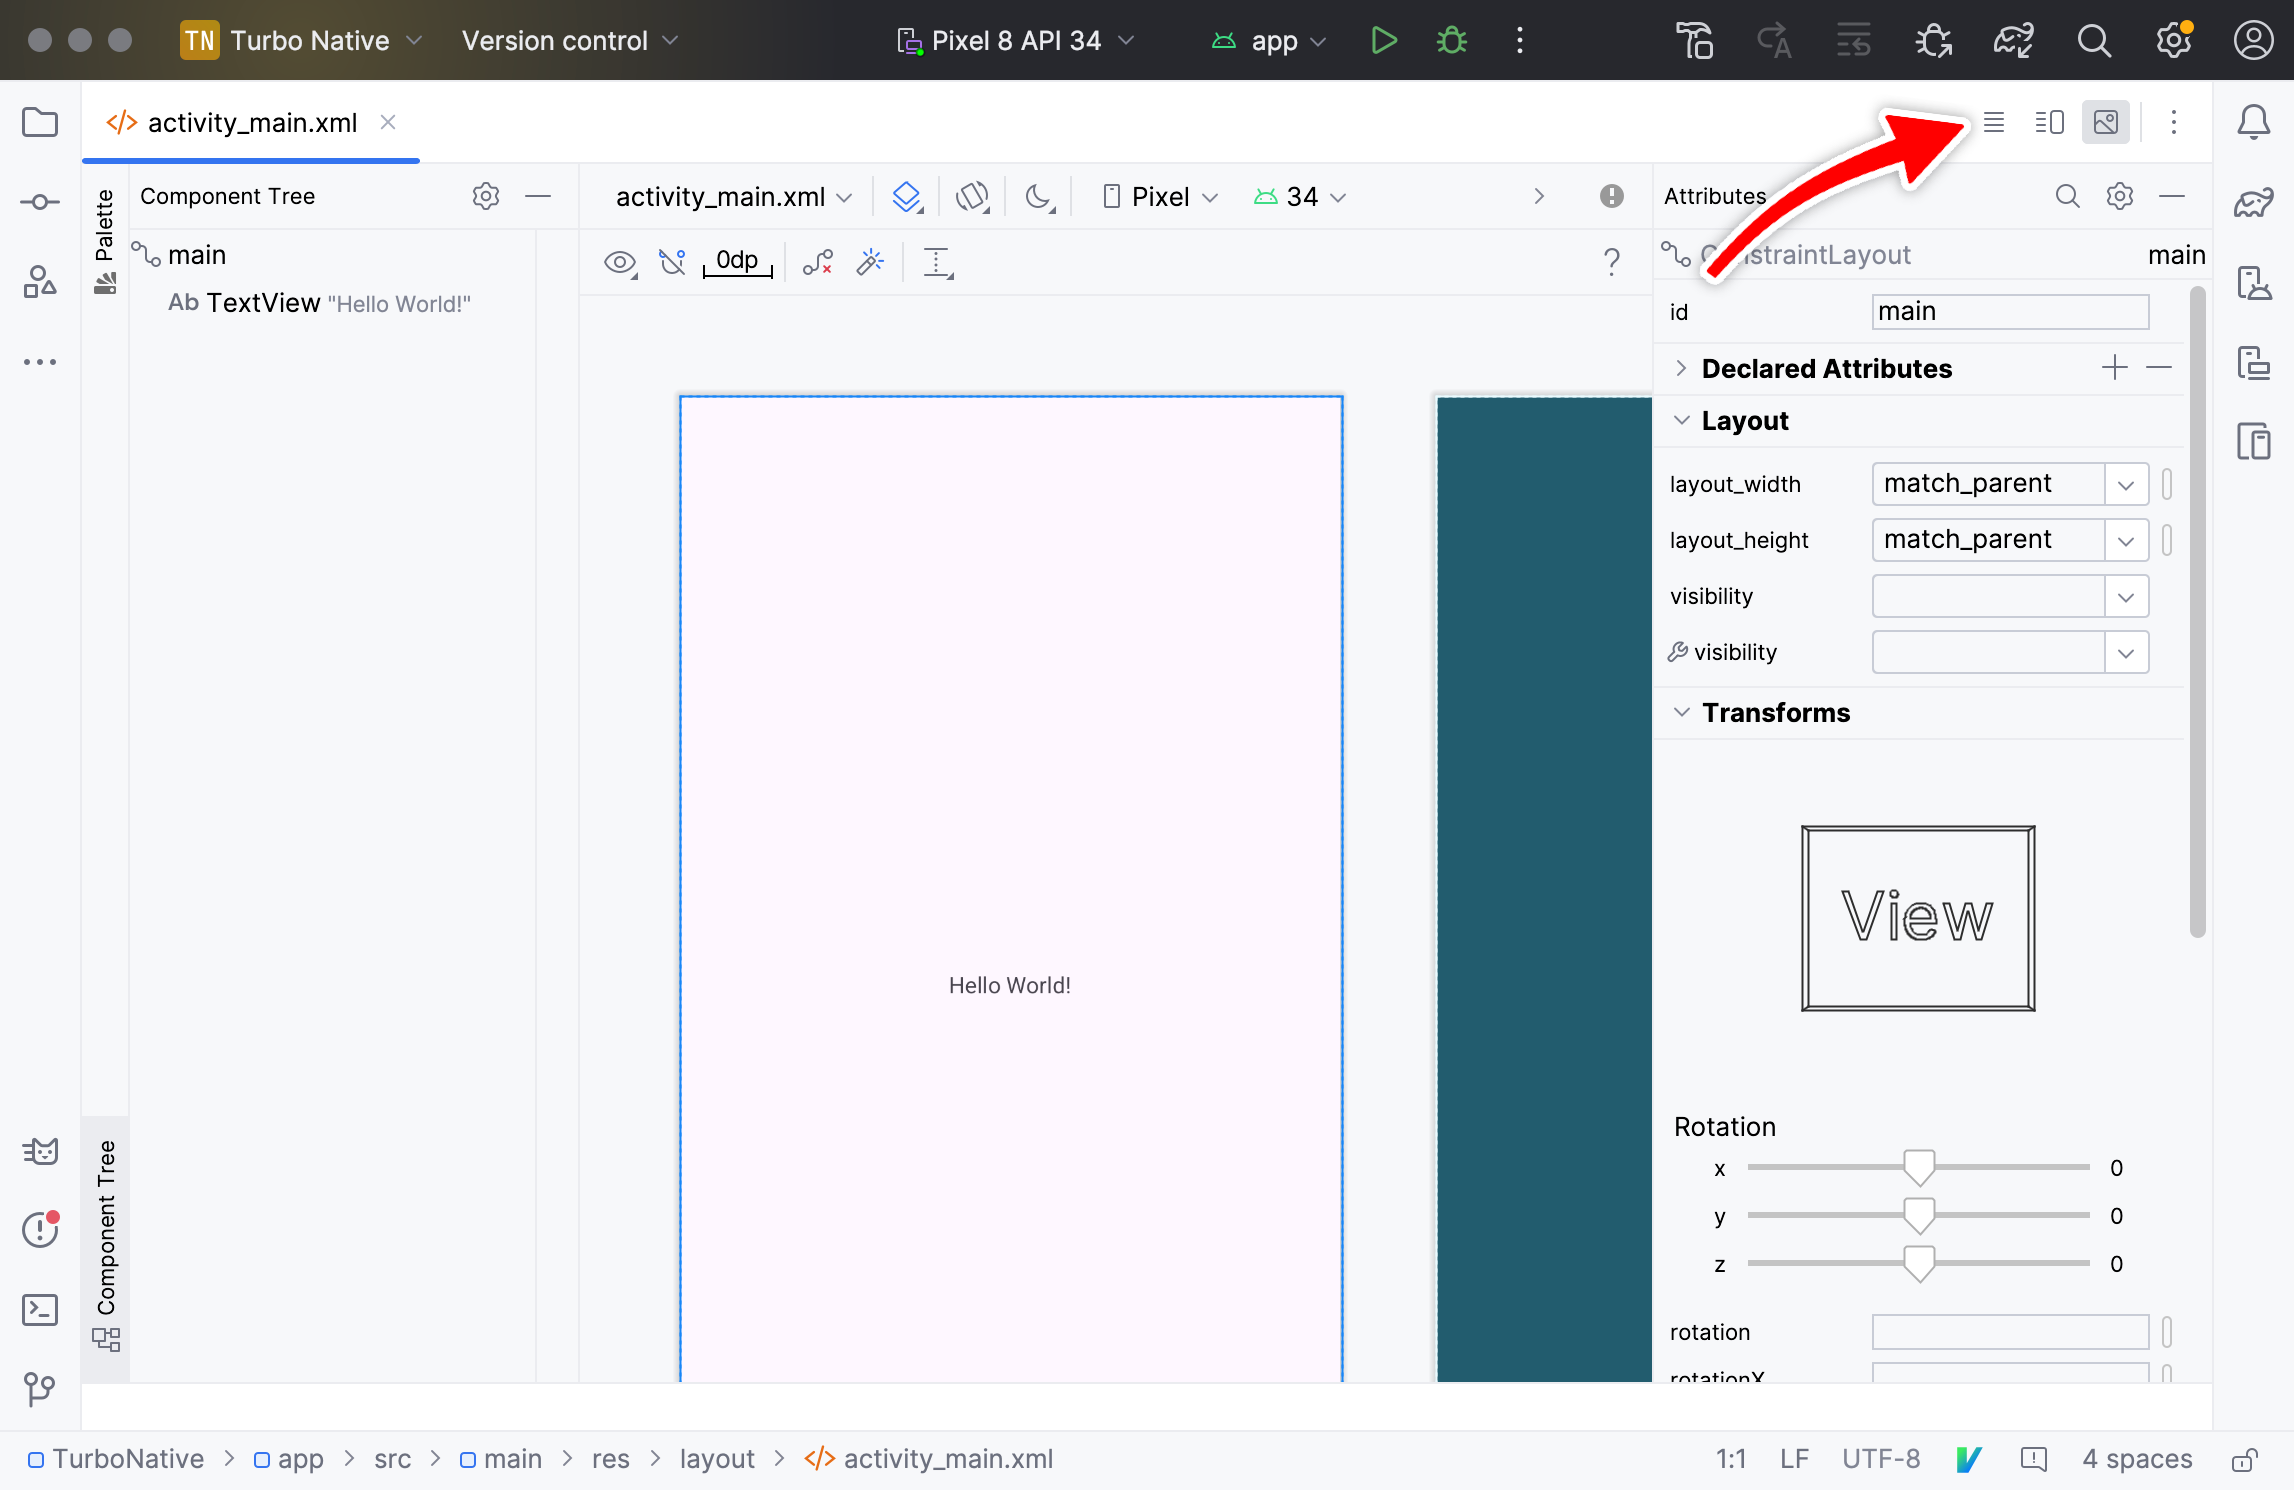
This layout wraps a <TextView> inside of a <ConstraintLayout>. But we want to render our NavHostFragment, not static text. Keep the wrapper node and replace <TextView> with an instance of MainSessionNavHostFragment, like so:
<?xml version="1.0" encoding="utf-8"?>
<androidx.constraintlayout.widget.ConstraintLayout xmlns:android="http://schemas.android.com/apk/res/android"
    xmlns:app="http://schemas.android.com/apk/res-auto"
    xmlns:tools="http://schemas.android.com/tools"
    android:id="@+id/main"
    android:layout_width="match_parent"
    android:layout_height="match_parent"
    tools:context=".MainActivity">

    <!--- Replace <TextView> with this node: --->
    <androidx.fragment.app.FragmentContainerView
        android:id="@+id/main_nav_host"
        android:name="com.example.turbonative.MainSessionNavHostFragment"
        android:layout_width="match_parent"
        android:layout_height="match_parent"
        app:defaultNavHost="false" />

</androidx.constraintlayout.widget.ConstraintLayout>
Now we need to tell the activity to use this layout. Double-click MainActivity.kt and implement the TurboActivity interface by adding it after the call to AppCompatActivity(). Like before, Android Studio will automatically import the class above.
package com.example.turbonative

import android.os.Bundle
import androidx.appcompat.app.AppCompatActivity
import androidx.core.view.ViewCompat
import androidx.core.view.WindowInsetsCompat
import dev.hotwire.turbo.activities.TurboActivity // <---

class MainActivity : AppCompatActivity(), TurboActivity { // <---
    override fun onCreate(savedInstanceState: Bundle?) {
        super.onCreate(savedInstanceState)
        setContentView(R.layout.activity_main)
        ViewCompat.setOnApplyWindowInsetsListener(findViewById(R.id.main)) { v, insets ->
            val systemBars = insets.getInsets(WindowInsetsCompat.Type.systemBars())
            v.setPadding(systemBars.left, systemBars.top, systemBars.right, systemBars.bottom)
            insets
        }
    }
}
More red squiggles! This time we’ll address the issue manually instead of relying on Android Studio. Hover over MainActivity for a second or two with your mouse cursor and the full error message will appear.
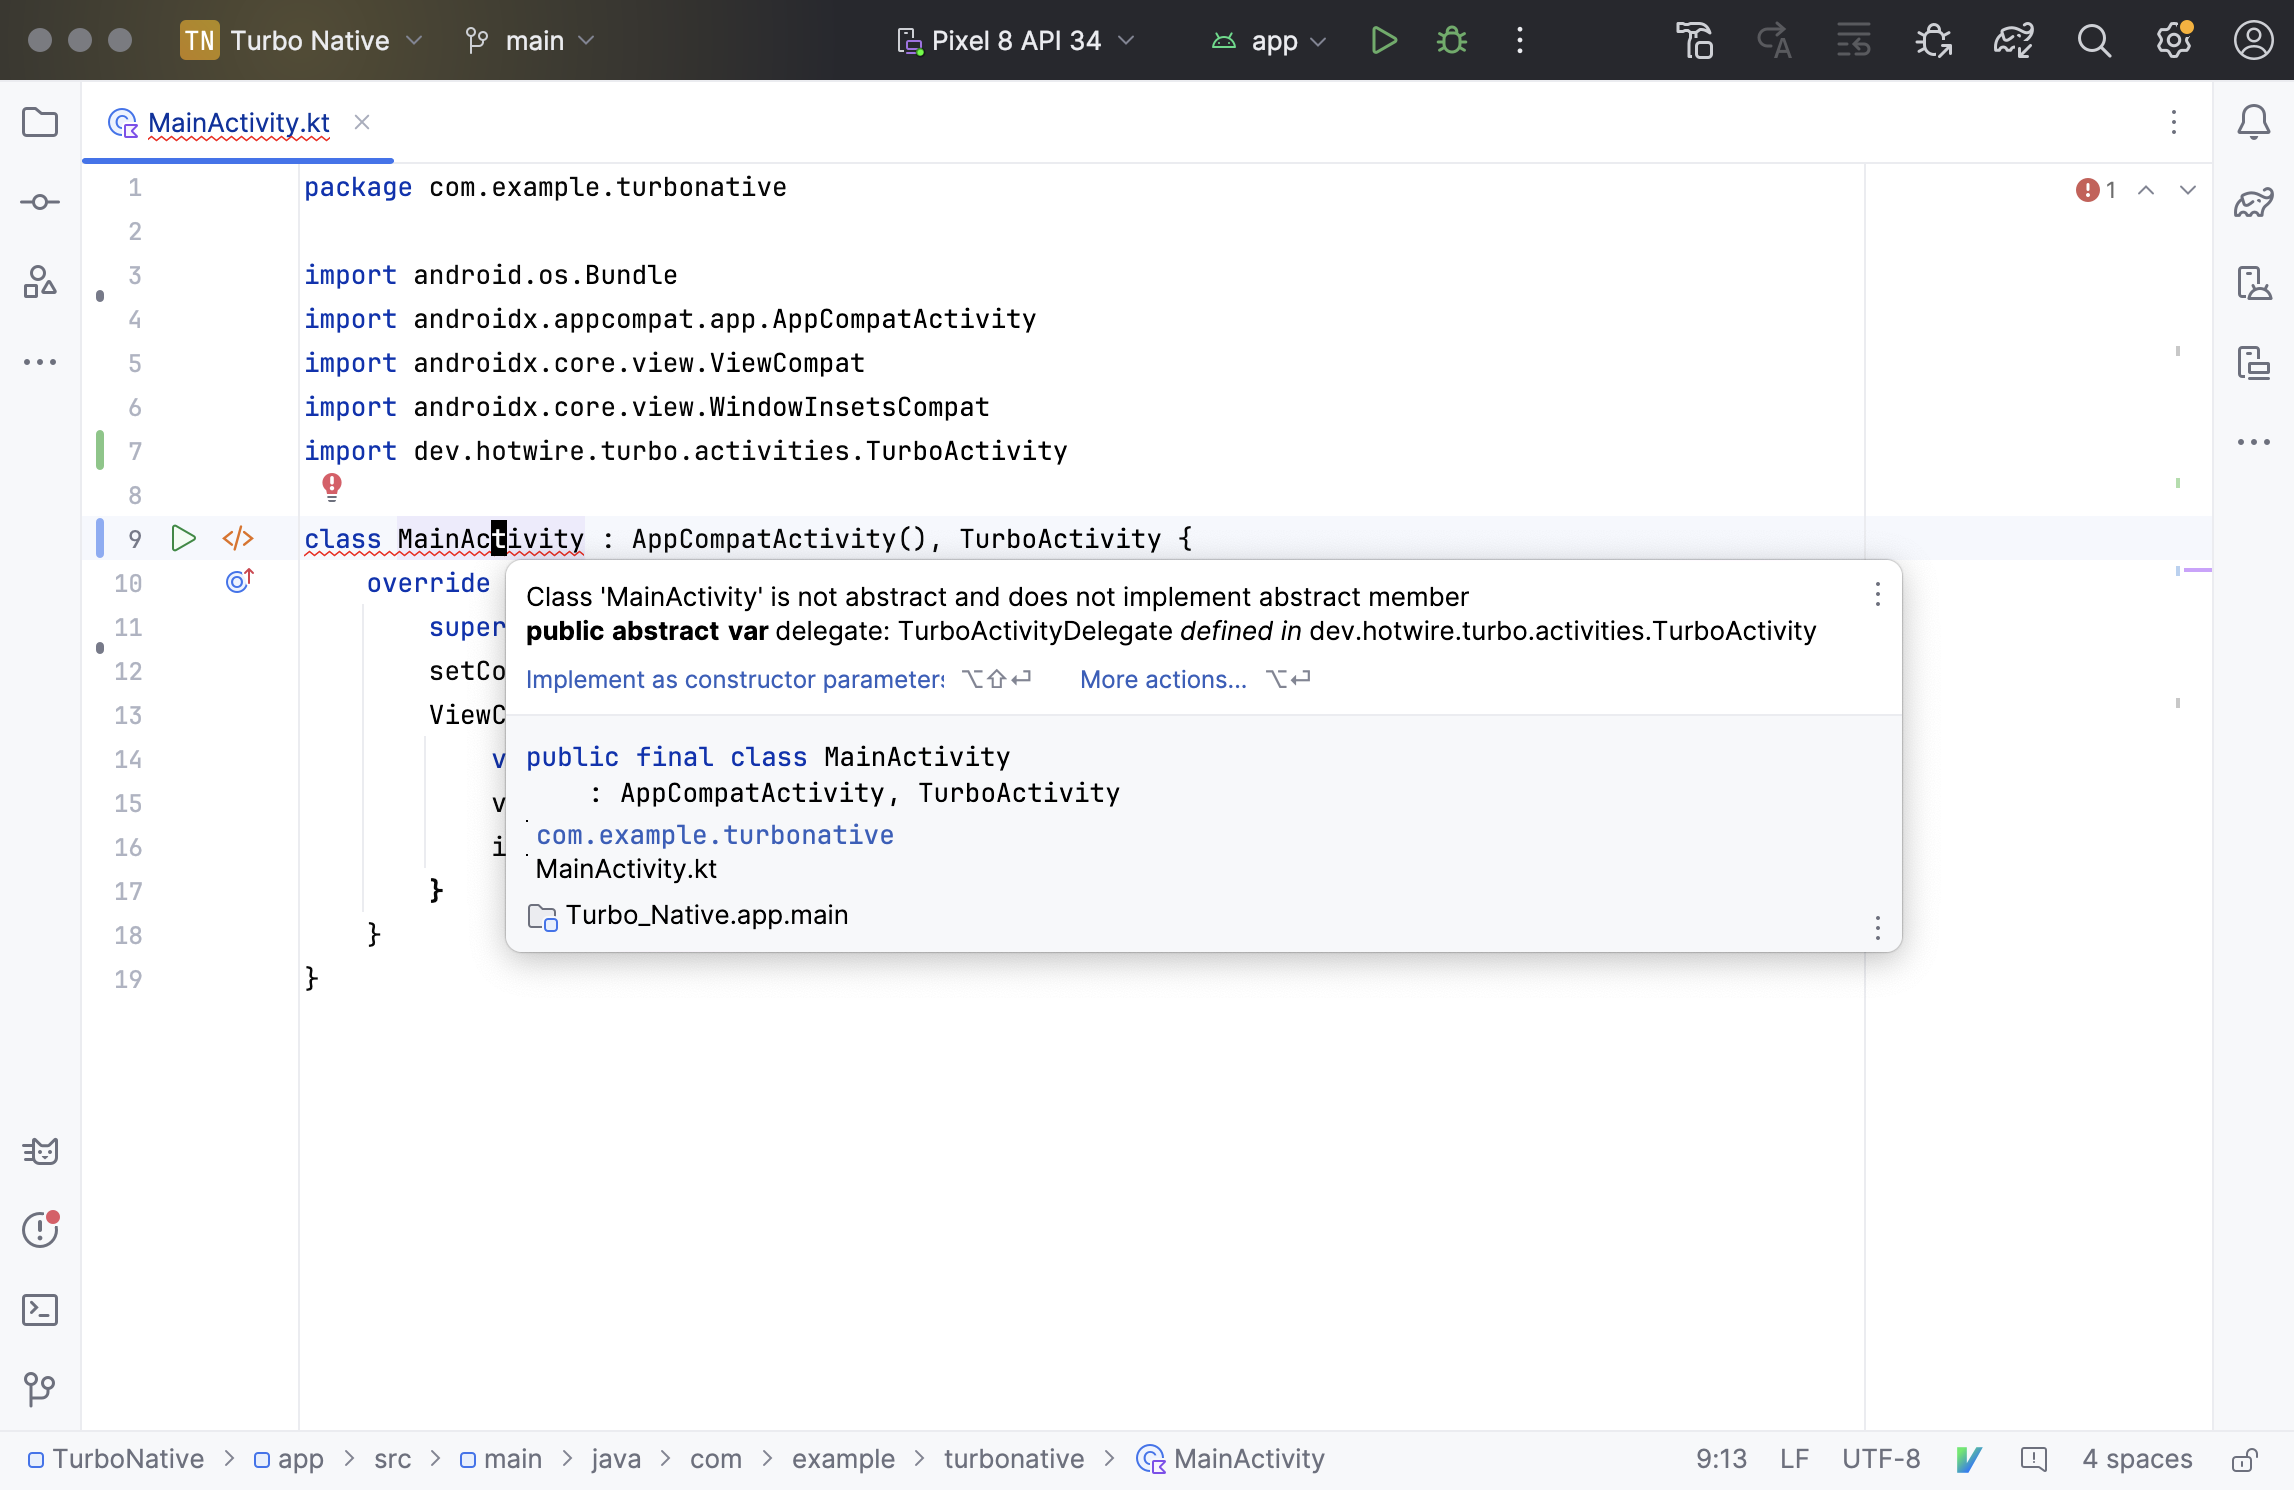
Fix the issue by adding a TurboActivityDelegate property to the class. Decorate it with the lateinit keyword - we will create the instance next. Once again, Android Studio will automatically import the class.
package com.example.turbonative

import android.os.Bundle
import androidx.appcompat.app.AppCompatActivity
import androidx.core.view.ViewCompat
import androidx.core.view.WindowInsetsCompat
import dev.hotwire.turbo.activities.TurboActivity
import dev.hotwire.turbo.delegates.TurboActivityDelegate // <---

class MainActivity : AppCompatActivity(), TurboActivity {
    override lateinit var delegate: TurboActivityDelegate // <---

    override fun onCreate(savedInstanceState: Bundle?) {
        super.onCreate(savedInstanceState)
        setContentView(R.layout.activity_main)
        ViewCompat.setOnApplyWindowInsetsListener(findViewById(R.id.main)) { v, insets ->
            val systemBars = insets.getInsets(WindowInsetsCompat.Type.systemBars())
            v.setPadding(systemBars.left, systemBars.top, systemBars.right, systemBars.bottom)
            insets
        }
    }
}
The last change for this file is to create and assign that delegate property you just created. Replace the lines related to ViewCompat to do just that:
// ...

class MainActivity : AppCompatActivity(), TurboActivity {
    override lateinit var delegate: TurboActivityDelegate

    override fun onCreate(savedInstanceState: Bundle?) {
        super.onCreate(savedInstanceState)
        setContentView(R.layout.activity_main)
        delegate = TurboActivityDelegate(this, R.id.main_nav_host) // <---
    }
}
This finds the MainSessionNavHostFragment we referenced in the layout file via the assigned android:id XML attribute. Now when the app launches it will render your NavHostFragment. Just like on iOS with Turbo Navigator!
All together, MainActivity.kt looks like the following:
package com.example.turbonative

import android.os.Bundle
import androidx.appcompat.app.AppCompatActivity
import dev.hotwire.turbo.activities.TurboActivity
import dev.hotwire.turbo.delegates.TurboActivityDelegate

class MainActivity : AppCompatActivity(), TurboActivity {
    override lateinit var delegate: TurboActivityDelegate

    override fun onCreate(savedInstanceState: Bundle?) {
        super.onCreate(savedInstanceState)
        setContentView(R.layout.activity_main)
        delegate = TurboActivityDelegate(this, R.id.main_nav_host)
    }
}
Three steps down and two to go: a web fragment and a path configuration. Web fragment next.
Create a web fragment
Turbo Native can present a new fragment every time a link is tapped. But we need to tell the library which fragment to use.
Create a new Kotlin file under com.example.turbonative named WebFragment. When it opens, replace the contents with the following:
import dev.hotwire.turbo.fragments.TurboWebFragment

class WebFragment : TurboWebFragment()
This inherits all of the functionality from the base TurboWebFragment so no additional code is required. Nice!
You need to register each fragment before it can be used. Register WebFragment in MainSessionNavHostFragment by adding it to the list of registeredFragments, like so:
// ...

class MainSessionNavHostFragment : TurboSessionNavHostFragment() {
    // ...

    override val registeredFragments: List<KClass<out Fragment>>
        get() = listOf(
            WebFragment::class
        )
}
Web fragment, check. One more step: the path configuration.
Create a path configuration
The path configuration is a JSON file that outlines a set of rules and settings for Turbo Native apps. On Android, it tells the library which web pages should be rendered via which fragment.
It can also be used to configure modals, route native screens, and more. While out of scope of this guide, you can check out the official documentation for more information on how it can be used.
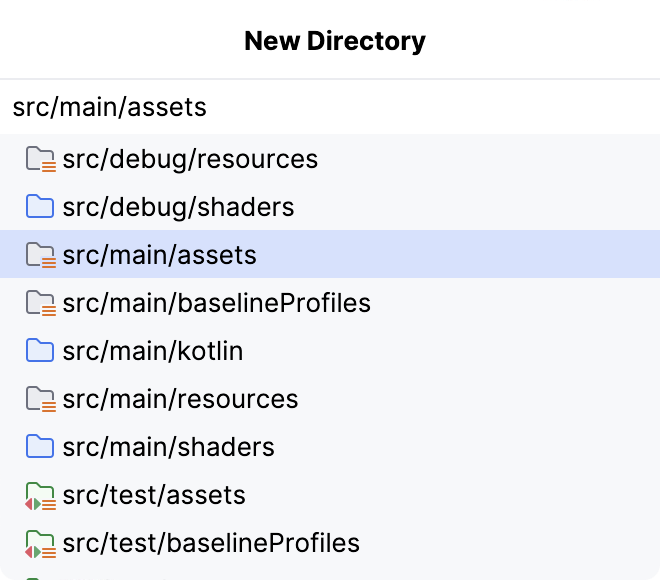
The path configuration JSON needs to live in the assets directory, which doesn’t yet exist. Create it by right-clicking on app in the left panel and selecting New → Directory.
In the New Directory dialog select or type src/main/assets and press Enter.
A new directory will appear in the left panel. Right-click it and select New → Directory. This time, type json in the New Directory dialog and press Enter.
Create the file by right-clicking the new json directory and selecting New → File. Enter configuration.json in the New File dialog and press Enter.
When the new file opens replace the contents with the following:
{
  "settings": {
    "screenshots_enabled": true
  },
  "rules": [
    {
      "patterns": [
        ".*"
      ],
      "properties": {
        "context": "default",
        "uri": "turbo://fragment/web",
        "pull_to_refresh_enabled": true
      }
    }
  ]
}
This is the minimum path configuration needed for an Android app.
The settings key enables screenshots via screenshots_enabled. When navigating back, a snapshot of the previous screen will be shown until the view finished loading (instead of a blank screen).
And the rules key declares an array of routing rules. Whenever a link is tapped the patterns key matches the URL path to determine what behavior to apply. The single rule used here routes all URL paths via the .* wildcard to the fragment identified by turbo://fragment/web.
But we haven’t identified any fragments yet. Decorate WebFragment with @TurboNavGraphDestination to bind the path configuration’s uri key to this fragment.
import dev.hotwire.turbo.fragments.TurboWebFragment
import dev.hotwire.turbo.nav.TurboNavGraphDestination // <---

@TurboNavGraphDestination(uri = "turbo://fragment/web") // <---
class WebFragment : TurboWebFragment()
Finally, tell MainSessionNavHostFragment where the path configuration lives:
// ...

class MainSessionNavHostFragment : TurboSessionNavHostFragment() {
    // ...

    override val pathConfigurationLocation: TurboPathConfiguration.Location
        get() = TurboPathConfiguration.Location(
            assetFilePath = "json/configuration.json"
        )
}
OK… moment of truth. 🤞
Run the app by clicking the green arrow at the top of the screen or via Run → Run ‘app’.
After the emulator spins up you’ll see your Android app hitting the demo server. Nice work, dear reader!
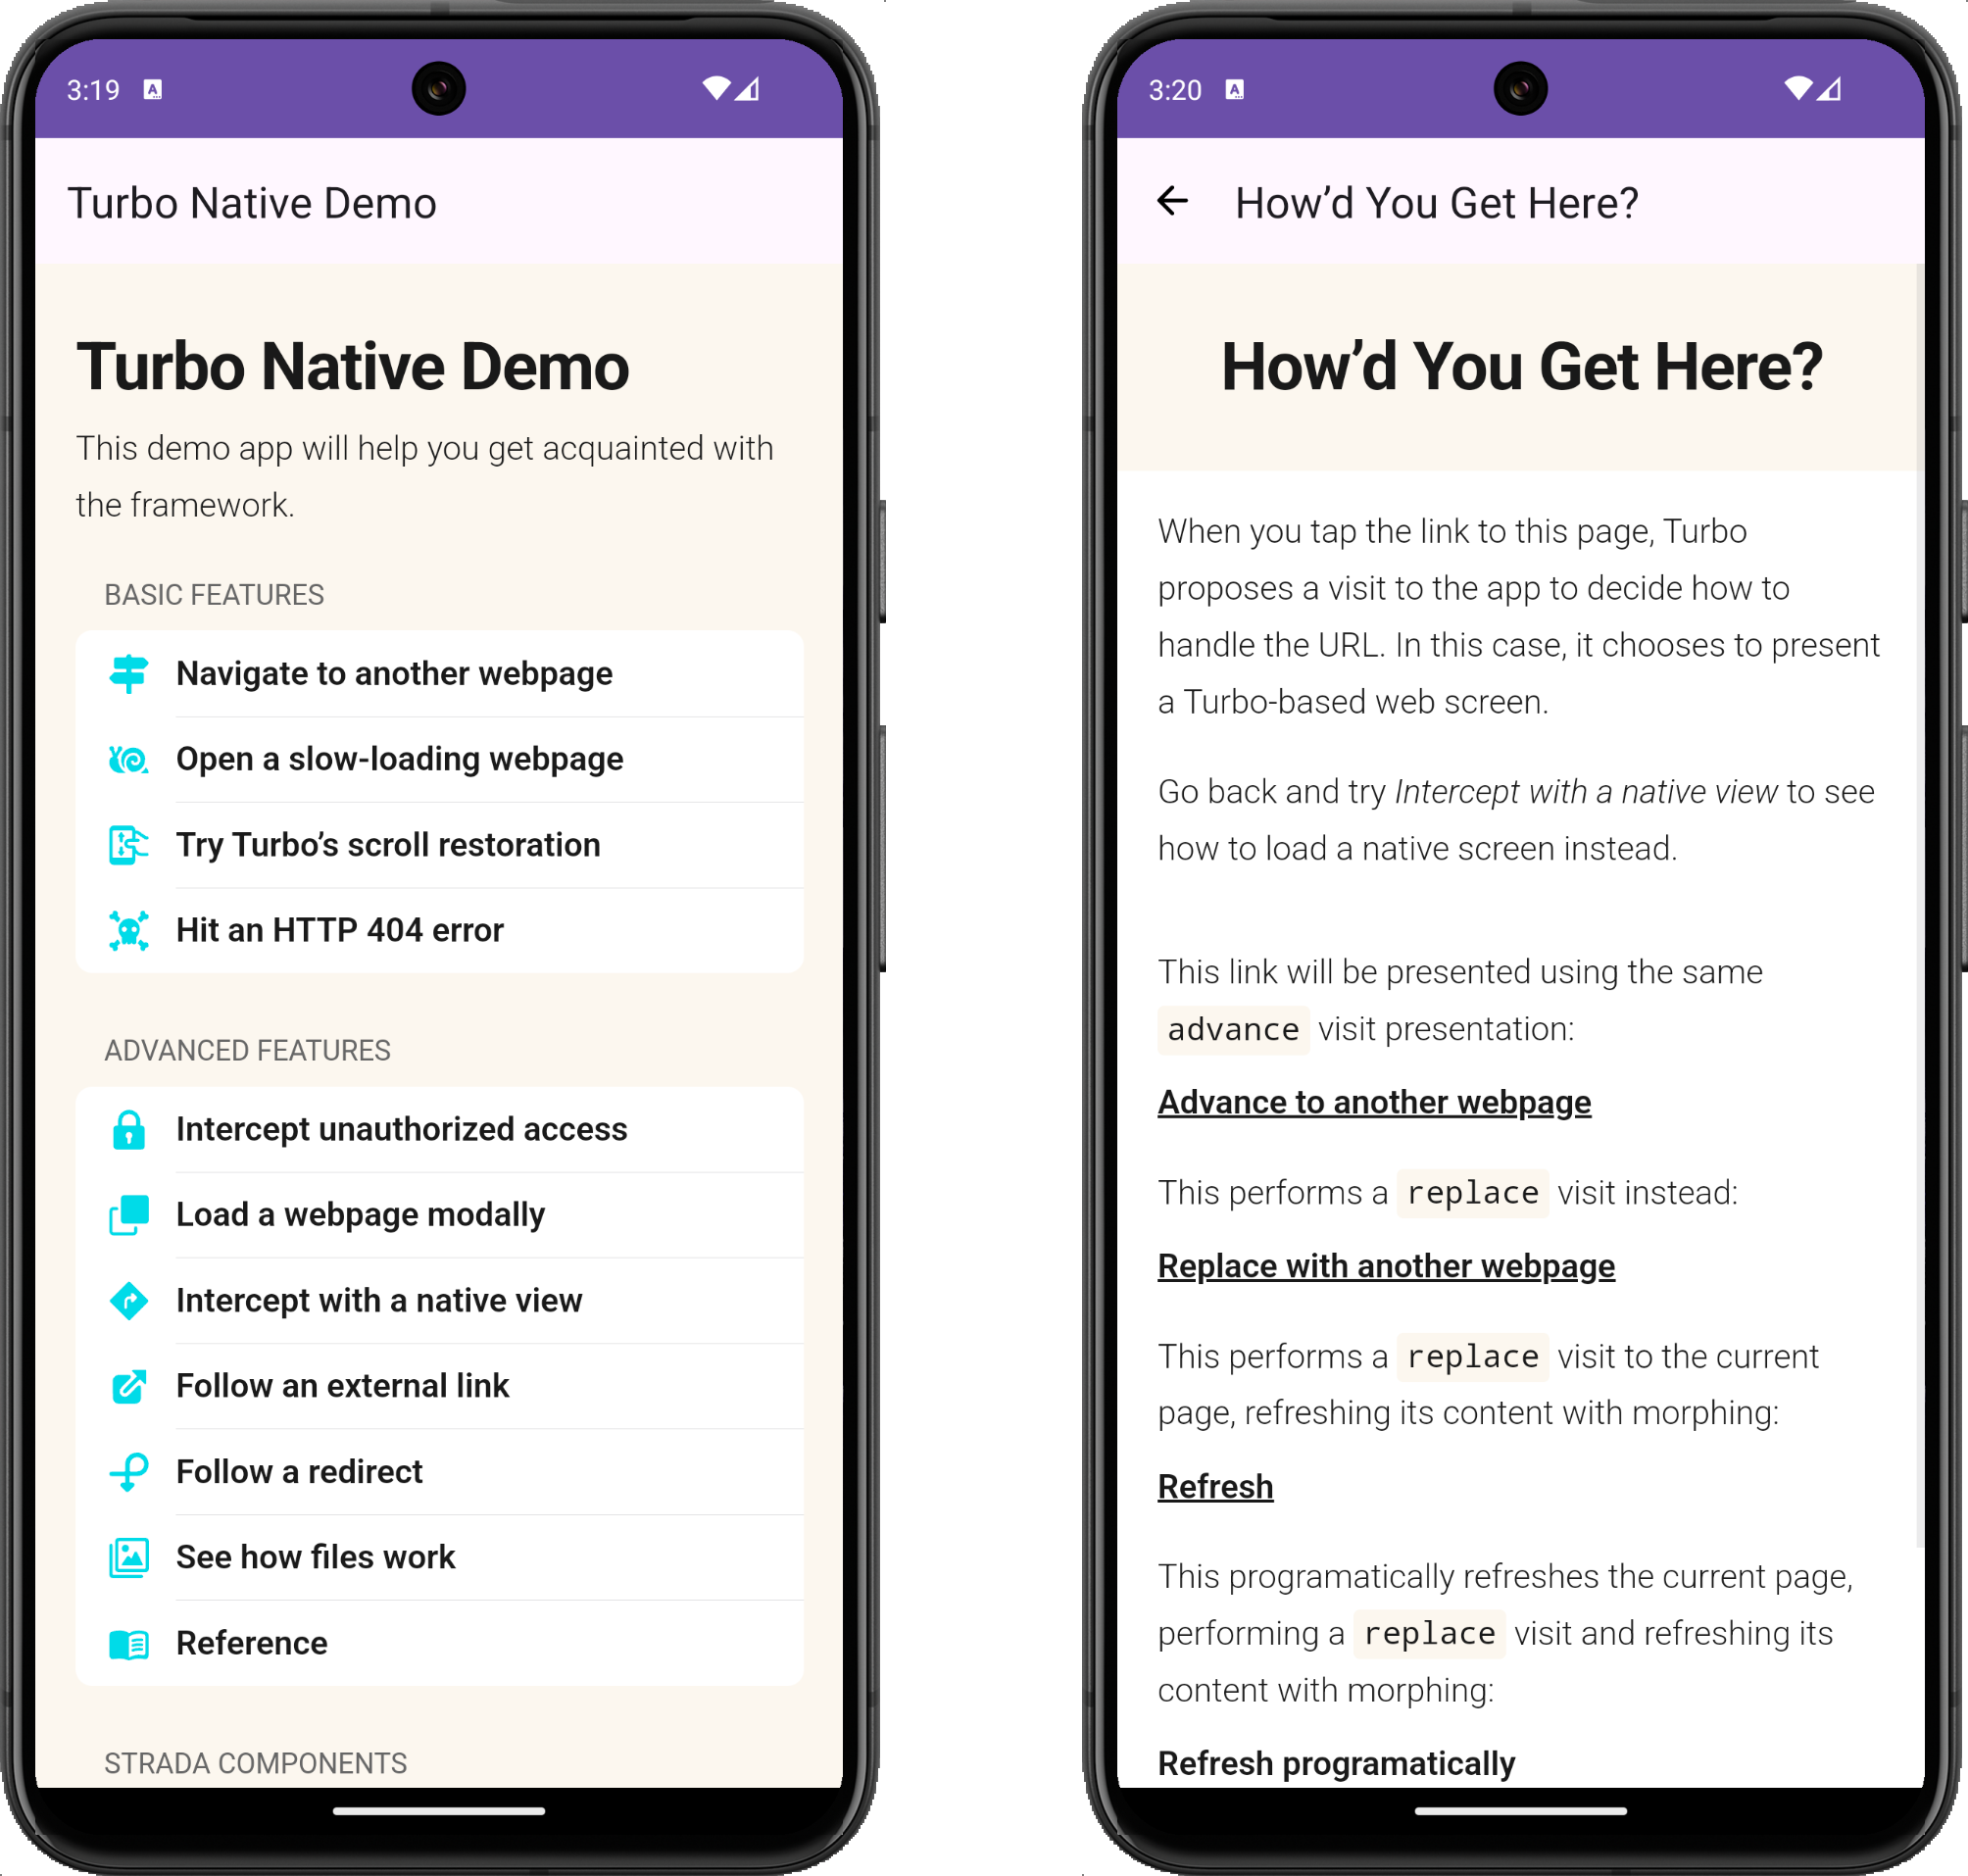
Remember, the server this app is pointing to assumes the app has all the code from the Turbo Native Android Demo project. So not everything will work with your codebase, like the Strada components, modals, or native screens.
Where to go next?
First, take a deep breath and congratulate yourself. You just built two Turbo Native apps in 15 minutes. Go you!
If you’re excited to learn more about Turbo Native I recommend a read through the iOS and Android documentation. There’s a lot of gold buried in those docs.
From there, you can have a go at adding a native Strada component, implementing a fully native screen, or conditionally rendering web content. The list goes on…
Finally, subscribe to my weekly newsletter to stay up to date on the latest Turbo Native news and get first access to tutorials like this guide. And if you need more hands-on help or training with your Turbo Native app then check out my services – I’d love to help!