
Dynamic UIMenu in Turbo Native apps
A big promise of Turbo Native is to progressively enhance a web screen with native components. And a common area to improve is the hamburger menu found in many apps.
Take, for example, my website. Tapping the Menu button opens a list of navigation options.
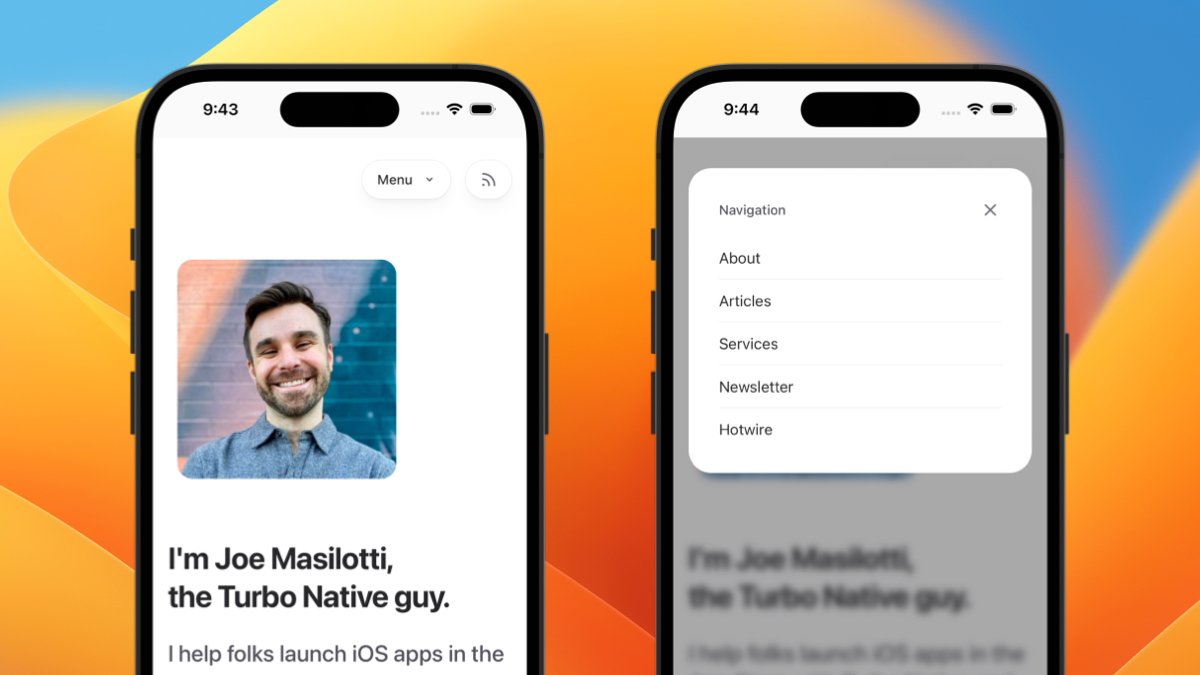
While fine for mobile web, using a HTML menu directly in a Turbo Native app can feel a little… off. The navigation bar at the top can make the button feel a little out of place.
Let’s convert this to a native UIMenu, dynamically powered by our existing HTML.
We will use a Stimulus controller to pass dynamic attributes from our navigation menu to the Turbo Native app. The app will parse this JavaScript message and build a UIMenu, adding it to the top controller.
Here’s what we will be building – let’s dive in!

Project setup
Let’s start by setting up our Turbo Native and web projects.
For Turbo Native, I recommend using my custom Xcode template. This will add a new template option to Xcode, making it easy to create new projects.
For the server, a new Rails app will work fine. If you are using an existing one, make sure Turbo.js hasn’t been disabled (it’s enabled by default).
How UIMenu works
The majority of our Swift code is around building a UIMenu, so let’s explore that native API.
At a minimum, a menu needs a title (or image) and children. It is then attached to a UI element, like a button.
let add = UIAction(title: "Add") { _ in
    // Do something when tapped.
}
let edit = UIAction(title: "Edit") { _ in
    // Do something when tapped.
}

let menu = UIMenu(children: [add, edit])
controller.navigationItem.leftBarButtonItem = UIBarButtonItem(title: "Menu", menu: menu)
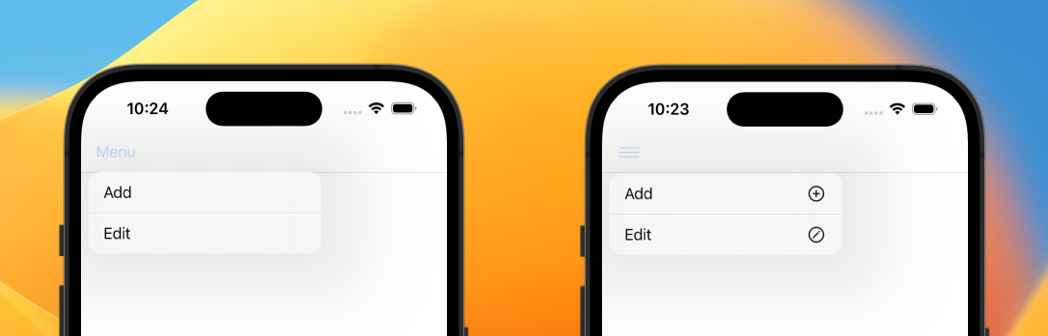
This adds a button in the upper left and when tapped reveals two buttons, Add and Edit.
We can farther customize the menu and actions with images, thanks to SF Symbols.
let circle = UIImage(systemName: "plus.circle")
let add = UIAction(title: "Add", image: circle) { _ in
    // Do something when tapped.
}

let pencil = UIImage(systemName: "pencil.circle")
let edit = UIAction(title: "Edit", image: pencil) { _ in
    // Do something when tapped.
}

let image = UIImage(systemName: "line.3.horizontal")
let menu = UIMenu(children: [add, edit])
controller.navigationItem.leftBarButtonItem = UIBarButtonItem(image: image, menu: menu)
Check out the docs for more ways to customize the menu to your liking.
The JavaScript bridge
To customize the menu items we will use the JavaScript bridge. This lets us pass dynamic attributes from our server to the app on every page load.
First, we need to set up a listener. This gets called every time a JavaScript message is fired.
Extend your TurboNavigationController to conform to the WKScriptMessageHandler protocol and implement the only required method.
extension TurboNavigationController: WKScriptMessageHandler {
    func userContentController(_ userContentController: WKUserContentController, didReceive message: WKScriptMessage) {
        print("Received message: \(message.body)")
    }
}
Now tell our Session to pass JavaScript messages to this controller instance.
let configuration = WKWebViewConfiguration()
configuration.userContentController.add(self, name: "menu")
let session = Session(webViewConfiguration: configuration)
To test this, fire a JavaScript message from your server. For now, throw this in any view or layout – it will be converted to Stimulus soon. When this page loads you should see a confirmation log in Xcode.
<script>
  window.webkit?.messageHandlers?.menu?.postMessage("Hi!")
</script>
Reopen the Xcode console by clicking View → Debug Areas → Show Debug Area.
Stimulus controller
Now that we have a working bridge between the server and app, let’s send the menu customizations. We can grab most of these properties directly from the DOM.
Here’s a simplified version of what a navigation menu might look like. Note each link is a target on the menu Stimulus controller. This lets us reference the items in JavaScript.
<nav data-controller="menu">
  <a href="/about" data-menu-target="item">About</a>
  <a href="/articles" data-menu-target="item">Articles</a>
  <a href="/services" data-menu-target="item">Services</a>
  <a href="/newsletter" data-menu-target="item">Newsletter</a>
  <a href="/hotwire" data-menu-target="item">Hotwire</a>
</nav>
With this markup we can bind the items to our Stimulus controller. It maps over each item target to build an array of objects to send to the app.
// app/javascript/controllers/menu_controller.js

import { Controller } from "@hotwired/stimulus"

export default class extends Controller {
  static targets = ["item"]

  connect() {
    const items = this.itemTargets.map(item => {
      return {
        title: item.innerText,
        selector: `a[href="${item.getAttribute("href")}"]`
      }
    })

    // Post the JavaScript message to the handler named "menu".
    window.webkit?.messageHandlers?.menu?.postMessage(items)
  }
}
Now that we have the message coming over the wire, we need to parse out our custom attributes and build the menu.
Parse the JavaScript message
The message is coming over the wire as a string, which is difficult to parse directly. We can leverage Swift’s built in support for JSON decoding to make our lives a bit easier.
First, create a data struct that conforms to Decodable with the attributes we need for each menu item. This ensures we can parse JSON directly into an object, safely.
struct MenuItem: Decodable {
    let title: String
    let selector: String
}
To work with the built-in JSON decoding APIs we need to convert our string to Data. Here we are serializing the body of the message to JSON data then decoding it to an array of MenuItems.
If you aren’t familiar with guard, it kind of works like a reverse if statement. So unless everything is true, we will bail out of this function via return.
func userContentController(_ userContentController: WKUserContentController, didReceive message: WKScriptMessage) {
    guard let data = try? JSONSerialization.data(withJSONObject: message.body),
          let menuItems = try? JSONDecoder().decode([MenuItem].self, from: data)
    else { return }

    print(menuItems)
}
If all went well, you should see the five menu items with their title and selector properties in the Xcode logs.
Now that we have the menu items as instances, we can iterate over them to create our UIMenu. This adds a bar button item to the left side of the screen on the top visible controller of the app.
let items = menuItems.map { item in
    UIAction(title: item.title) { _ in
        // TODO: Handle button tap (next code block).
    }
}

let image = UIImage(systemName: "line.3.horizontal")
let menu = UIMenu(children: items)
topViewController?.navigationItem.leftBarButtonItem =
    UIBarButtonItem(image: image, menu: menu)
Handle the button tap
Finally, we need to handle what happens when the button is tapped. Here we ensure the top controller has a web view and evaluate some JavaScript on it.
Remember that selector property we sent in the Stimulus controller? We can use this to uniquely reference the link in the DOM. And by clicking it directly we don’t have to worry about what it does - it could visit a page or make a POST request.
The app doesn’t, and shouldn’t, care!
// Ensure the visible controller has a web view.
guard let visitable = self.topViewController as? VisitableViewController else { return }

let script = "document.querySelector('\(item.selector)').click();"
visitable.visitableView.webView?.evaluateJavaScript(script)
Next steps
Now that we have the infrastructure for dynamic menus, we can start customizing other pieces.
We could pass down images for each menu item or even a subtitle for the menu itself. Another option is to mark an item as destructive, making it appear red.
This approach proves a flexible way to dynamically build native elements in a Turbo Native app. It isn’t limited to just menus and can be applied to other APIs.
But what about Strada?
The Hotwire-savvy developer might notice that this is exactly what Strada promises:
“[Strada] makes it easy to progressively level-up web interactions with native replacements.” - Hotwired.dev
Strada is set to be officially released at Rails World this October. Assuming the library doesn’t change from this promise, I’m excited to update this tutorial for Strada support!
I’m hoping it simplifies the manual JSON parsing and makes it even easier to build native elements in Turbo Native apps.
What about you? What native elements are you hoping to build with this approach or Strada?
Send me an email to let me know – I’d love to hear from you!