
How to test deep links with UI Testing
Deep linking, and even universal links, are an important part of the app ecosystem. They seamlessly link content inside your app to the external world. Often these flows have complex behaviors with lots of branching logic. All the more reason they need to be covered by automated testing.
UPDATE October 25, 2023: Starting with iOS 16.4, macOS 13.3, and Xcode 14.3 you can bypass all of this nonsense and open URLs directly with open(_:). If you are able to use these toolchains I recommend this function instead of what follows.
Previously, I would extract the logic to some “test only” helper method on my root controller and call that via a hidden button press in UI Testing. This works, but it has two major issues:
- It doesn’t simulate the actual behavior of going through
AppDelegate - You have to add custom, test-specific code your application bundle
We can solve both of these problems by embedding a tiny HTTP server inside our test suite! Here’s how I test deep links with UI Testing.
How to manually open deep links
First, some background. There’s a tiny trick with opening a deep link in iOS: you have to actually tap it. You can’t copy and paste something into Safari and tap “Go”, it won’t register.
We can take advantage of this by creating a tappable link somewhere on the simulator. We could drop it right in the app, but that brings us back to issue #2. Instead, let’s use Mobile Safari.
Create a tiny server
To ensure all the code remains in the test suite, we can create a tiny HTTP server with Swifter. We can then access the site directly with Mobile Safari on the simulator.
To get a feel for the library add it as a Cocoapod (or Swift Package) and this code.
import Swifter

let server = HttpServer()
server["/index.html"] = { _ in
    .ok(.text("Hello from Swifter!"))
}
try server.start(8080)
Run your app and open Mobile Safari inside the simulator. Point it to http://localhost:8080 and you should see the message!
Start the server under test
Now that we know how Swifter works, remove the dependency from your application code and add it to your test target. Doing so ensures the library doesn’t get bundled when you deploy your app to the App Store.
Open your UI Tests and create a helper method to start the server. Here I’m using com.masilotti:// as the deep link. Replace this with whatever URL scheme your app registers.
import XCTest
import Swifter

class UITests: XCTestCase {
    let app = XCUIApplication()
    let server = HttpServer()

    func testSwiftServer() throws {
        try startServer()
        app.start()
    }

    private func startServer() throws {
        try server.start(8080)
        server["/index.html"] = { _ in
            .ok(.htmlBody("<a href='com.masilotti://'>Deep link 1</a>"))
        }
    }
}
Open Safari and click the link
Now that we have the server running under test, let’s open the deep link. To do so we need to:
- Open Safari.app
- Visit the Swifter server
- Find and tap the link
- Wait for the app to launch
Open Safari.app in UI Testing
We can open any installed app on the simulator via its bundle identifier. Mobile Safari’s identifier is com.apple.mobilesafari. Opening an app is asynchronous, so the third line ensures that it actually opened.
let safari = XCUIApplication(bundleIdentifier: "com.apple.mobilesafari")
safari.launch()
XCTAssert(safari.wait(for: .runningForeground, timeout: 5))
Visit the Swifter server
We can take advantage of the descendants(matching:) to find an element that identifies itself as “URL.” This removes the need to know exactly know what type of element the URL bar actually is. It also future proofs us against the type changing in the future!
safari.descendants(matching: .any)["URL"].tap()
safari.typeText("http://localhost:8080/index.html")
safari.buttons["Go"].tap()
Disable “Slide to Type” in UI Testing
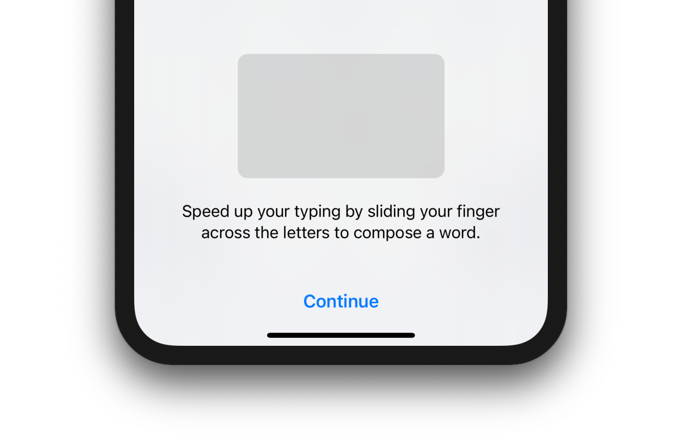
The first time the keyboard appears you need to dismiss the “Slide to Type” interface. The if statement ensures the code works on subsequent launches.
if safari.buttons["Continue"].exists {
    safari.buttons["Continue"].tap()
}
Find and tap the link
After visiting the server we need to wait for the link to appear, then tap it. Lucky for us the API for a web view is very similar to native app code.
XCTAssert(safari.links["Deep link 1"].waitForExistence(timeout: 5))
safari.links["Deep link 1"].tap()
safari.buttons["Open"].tap()
The “Open” button appears in a native alert when you tap a deep link.
Our last bit of code ensures that our app was opened successfully. Again, this is asynchronous so we need to do a bit of waiting.
XCTAssert(app.wait(for: .runningForeground, timeout: 5))
Putting it all together
And there you have it! An easy way to test deep links with UI Testing. This approach can even be expanded to test multiple deep links by creating more links in the server.
Here’s the full code snippet you can copy and paste into your test suite.
import XCTest
import Swifter

class UITests: XCTestCase {
    let app = XCUIApplication()
    let server = HttpServer()

    func testDeepLinkViaSafari() throws {
        // Install the app to register the deep link.
        app.launch()

        // Start a Swifter server with a deep link.
        try server.start(8080)
        server["/index.html"] = { _ in
            .ok(.htmlBody("<a href='com.masilotti://'>Deep link 1</a>"))
        }

        // Open Safari, wait for it to launch, and visit the Swifter server.
        let safari = XCUIApplication(bundleIdentifier: "com.apple.mobilesafari")
        safari.launch()
        XCTAssert(safari.wait(for: .runningForeground, timeout: 5))
        safari.descendants(matching: .any)["URL"].tap()
        if safari.buttons["Continue"].exists { safari.buttons["Continue"].tap() }
        safari.typeText("http://localhost:8080/index.html")
        safari.buttons["Go"].tap()

        // Wait for the page to load and open the deep link.
        XCTAssert(safari.links["Deep link 1"].waitForExistence(timeout: 5))
        safari.links["Deep link 1"].tap()
        safari.buttons["Open"].tap()

        // Wait for the app to enter the foreground.
        XCTAssert(app.wait(for: .runningForeground, timeout: 5))
    }
}